February 28, 2010

Del Prado 1:72
Leopard 2 A5
color comparison

In my last post I wrote that the green color used on the Del Prado Leopard is too bright. Today I made some photos of real Bundeswehr equipment to show that this is true.
On the left side of the picture you can see the model, on the right you can see a Bundeswehr transporter. You can see, the colors that Del Prado used are not authentic, they are way brighter than the
colors that are used on the real model.

By the way I got today my first two books about the Eastern front of WW2 at the monthly fleamarket. They include a lot of pictures and some informations, I did not have the time to check the text, I just watched the pictures in it.

When I have read them I will write something about the books. I bought the following books today:
Guido Knopp "Der verdammte Krieg / Das Unternehmen Barbarossa"
ISBN 3-570-01229-8 for 3,5 Euro and

Laurence Rees "Hitlers Krieg im Osten"
ISBN 3-453-17289-2 for 4,5 Euro


But now I have to recover my strengh, today I had a lot efford. Maybe I will post later in the evening something more, but at the moment I just want to get off my wet clothes, eat something and just chill out a little.

Offtopic:
I found out where Lost & Found Records got the covers of some their bootlegs they released in the early ninties, check out the following picture comparing my "Siege" CD (I own this great CD for almost 20 years now) with a picture from the G.Knopp book.

February 26, 2010

Del Prado 1:72
Leopard 2 A5

Yesterday I saw a tv commerical for a new 1:72 tank collection by Del Prado. I said to myself, let me check this out. Today I got it from the supermarket, it costs 3,99 Euro.

At the first look it looked well, except for the tank in a clear try I got a little magazine with some little general informations about tanks and some informations about the Leopard 2. And a lot of advertising for this collection.

The tank in a clear case. In the back there is a picture of a Leopard 2, on the back of the picture are some informations about this tank like the size, the lenght, the motor and some other.

The tank guided by some modern German Infantry made by Revell.

A front view of the Leopard 2 A5. I have no idea on whose manufacturers model this tank is based but I am not interested in post ww2 tanks, that I will not do any search for this.

The lower parts of the tanks are mode of plastic, the tracks are made from rubber and the upper parts are made of die-cast metal with plastic parts for the details. The level of detail is not as good as promised in the advertising, but I did not expect more. The quality of a Dragon or Revell kit is much better. And if you know the "Easy Model" models, they are a lot better (they base on Trumpeter kits).

The paintjob on this model is fairly good, but I think the green is too bright. At a gas station near my home are always some Bundeswehr trucks standing, tomorrow I will do a picture of them just to compare the colors of the camo scheme.

The next three announced models are the Tiger, the Elephant (Sd.Kfz 184) and the Jagdtiger, these kits will cost the regular price of 11,99 Euro, if you subscribe you will pay "only" 10,99, and you will get some goodies like a display case and a Sd.Kfz 9 Famo with a Sd.Ah. 116 tank trailer. That's the only positive I found so far.

My
personal opinion is:
For the low price, this model is OK. It might be great for wargamers but if you want a good model of a Leo 2, you should buy a model kit and build it for yourself. Maybe I will subscribe to get the Famo + trailer but then I will quit the subscription.
For all other people who want to subscribe, I do not want to use the term rip-off, that's why I quit writing this post.

February 23, 2010

1:72 Soviet Figure Conversions

Two weeks ago I asked my readers for some help and I am glad to say that I got it. The postman brought me today a letter full of the needed figures.

I have to send out a BIG CHEERS to Hugh from the UK who helped me out with some dimestore figures. Please take a look to
his interesting blog about his toy figure collection.

I needed them to strenghen my soviet mortar groups which lacked of officers.


These figures were used to build a kneeling officer with binoculars:
- a cheap Airfix clone soldier with binoculars (upper body),

- the kneeling gunner from the Airfix WW2 Soviet set (lower body), and

- the stupid runner of the ESCI/Italeri WW2 Soviet set (gun and spare magazine).

Sorry about that but I think the ESCI figure is one of the most useless figures that I have, beside the dull ESCI German paratroopers set.


New figure front view


New figure rear view

There is still some flash on the figure but I think I will keep it because it is nearly invisible at this scale. Eventually I will add some more equipment to the figure, I have some sprues of Preiser's German equipment. I have to build 5 more of these figures, then I have all figures I need and I can start with painting at the weekend.
I hope I can animate a frient of mine to help me with painting, he told me that he thinks he can't paint figures in this scale, but I was thinking that too before I made my first tries.


Thank you Hugh, your were a great help for me :D .


Small update picture:

February 22, 2010

Faces Of War (1)

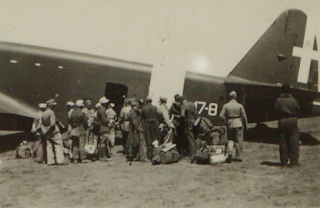
These pictures were made by my grandfather who was in the Afrikakorps during World War 2. I had never the chance to ask him about his experiences he made, he died when I was a kid. My mother found them in the back of a cabinet while she was cleaning up.

All these pictures are presented to the public for the first time. Please excuse the bad quality but I had to photograph them because my scanner is broken. When I get a new scanner I will scan them. I give my permission to use them on other homepages, for uncommercial purposes only. If you want to use them please send me a note, you can find my email adress on the right side of this page below the links.


Creative Commons Lizenzvertrag

Dieses Werk ist lizenziert unter einer Creative Commons Namensnennung
 - Nicht kommerziell - Keine Bearbeitungen 4.0 International Lizenz. -

Factory Hall -
Made Of Foam Board

I finished my first foam board building just one moment before but now it is late and I am tired of this weekend that I will not write too much about the built. I hope the pictures are self-explainig.Here is a step by step report of the built.


The tools I used.

All windows and doors are drawn in.

This is how it looks after I cut it all out.

The building glued on a base.
The edges were cut to give it a ruined look.

The first paint progress.

I forgot to work on the corners before I started to paint it.
The corners are made of matches, I filled the gaps with acrylic putty.

The building is finished.

I used grey as base color.

After that, my selfmade wash was used to give it an used touch.

I think it looks good. Tomorrow I will build the next buildings for my little "Papergrad".
(This post was powered by Krombacher)

February 19, 2010

Pegasus 1:72
German Elite Infantry


The second post for tonight. These are pictures of my first attempts of painting figures. I painted them in the summer of last year. The figures are from the two Pegasus SS sets, the Hät machinegun team set and the Hät IG 18 infantry gun kit. The Panzerschreck bazooka comes form the "German Infantry" set of Hasegawa and was supplemented with a scratch built shield and a carrying belt.

I used Tamiya acrylic colors according to the instructions on the back of the first SS set of Pegasus, but I did not any shading or washing on it. The bases are from Games Workshop.
Some more detailed pictures of the IG18 gun can be found in my contribution on Hät's "Everything Toy Soldiers" website following this link.

Hen Long 1:72
RC Tiger Minus RC

Remember this post with my Hen Long RC Tigers ?

I wanted to start a little tank battle with a friend, but I had to determine that only one of them functioned, all other Tigers did not work. That sucked. So I made my thoughts how I could recycle them.

The first step was to open them and take out all electronics and gears. Then I used Milliput to close all holes of the leds and switches. After the Milliput was hardened I used a hobby knife and some sanding paper to smooth the surfaces. I took some little plastic pieces for detailing the hatches. The next step was to clean all roadwheels from excess plastic (hm, sometimes I wonder about my English), what took a little more time than I tought.

After glueing all parts together I started with the paint. The base color is GW Codex Grey (#61-52) darkened with black, a fresh pot of grey plus 4 or 5 ml Black, that gave me a fine dark grey. Then came a wash with some selfmixed black ink. The drybrushing was done with Hobbyline Grey (#27) and then I painted some details as the ropes and tools, all with different GW colors.

There are only a few things to do, the tracks will get some color, all tanks will get some decals, and last but not least I have to seal the paint with matte varnish. A friend suggested to give them a winter camo, maybe I will do this.