In my next post I am going to take a closer look at the M163/M901 tank expansion for "TANKS The Modern Age". But in this posting I will jump directly to the recycling of the leftover bits.
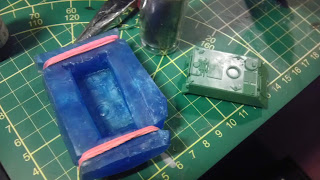
Instead of the 3D printer this time some stuff called "Oyumaru Instant Mold", repacked by pk-pro, was used.
If you are not familar with this thermoplastic stuff, you can watch this video to see how to use it. The only thing I would like to add is, that if you wear 2 or 3 pairs of rubber gloves you can handle the very hot stuff much better.
I used some cheap and pretty fast hardening epoxy, you can see it on the right of the first picture. Milliput and Greenstuff would also work fine but would need more time to get hard.
As a first step I made the mould, my mate Olli made a video of another mold I made to demonstrate how I used the silicone:
The following pictures show what I did after the mould was ready to use.
After the epoxy was pressed in the mould, it was hardened after approximately 30 minutes. Then I took the dublicated part from its mould.
A pair of selfmade tank tracks.
A first testfit shows that the new tracks fit fine.
I also dublicated the front hatch but then I mentioned that I could use the original part from the kit.
The sideskirts were also cloned, the new parts are pretty fragile but almost as thin as the original part.
Now it is getting advanced, I tried to copy a full tank hull. Since the M163/M901 have different tops, I temporarely glued the top of the M901, the version I wanted to recreate, with whiteglue, then I repeated the steps to build a new mould:
When the mould was hardened I had to cut it on both ends to get the kit out of the mould. On the first look the mould looked alright but a closer inspection showed that the temporarely fixed top part of the tank had seperated from the tank hull, what caused a slight deformation of the mould.
But anyway...
I filled the new mould with the epoxy, since I did not have not enough of it, I added a dice into the mass to compensate this.
The part fresh released from the mould compared to the original part. You can see, thanks to the defect mould, one of the edges of the new tank was sunk in.
But that did not stop me, Istill had the original top part which otherwise would not be used.
A first dryfit shows that I would have to sand down a big part of the top.
The first layers of the hull were sanded down, one step closer to success.
The top part was glued on the hull, using cyanoacrylic gel glue. The tracks were dry fitted on the new tank, after some sanding they fit almost perfect. Also their thickness was after some sanding just like the original.
The new parts are ready to get glued to the tankhull.
The remaining gap between hull and top was closed with Milliput. Then I attached the tracks and sideskirts. The last part to build was the TOW launcher which was magnetised.
Compared to the original model the dublicated model does not look too bad, you may compare it to a garage kit made from worn out moulds made by an absolute beginner. The quality is not perfect but I like this thing very much, not only because I found a new way to recycle some leftover bits.
When I get a second M163/M901 "TANKS The Modern Age" expansion, I definitely will try this again.
When I get a second M163/M901 "TANKS The Modern Age" expansion, I definitely will try this again.
But take a look at the result for yourself.
The only greater fault is one of the tracks. Idid not glue it straight on the hull. When I noticed it and tried to remove fix this, the trackpart broke. Because of that I kept it as it was.
Last but not least, a picture of both finished tanks. The dublicate does not look too bad or does it ? In the next post I will give this kit a closer look.


No comments:
Post a Comment