Showing posts with label Scenery. Show all posts

September 16, 2019

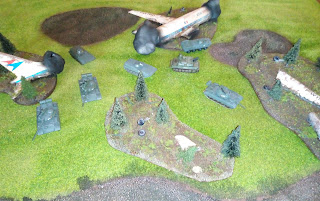
15mm Planecrash
Scenery Pieces

After the Soviet forces crossed the inner German border, big parts of Germany were conquered and sucessfully defended by them, while their allied Warsaw Pact forces rushed forward to reach the French border.

It is still unclear, what happened to F-WTMD. NATO and Warsaw Pact accuse each other. An small East German unit was near while the crash happened and reached the crashsite first.

It seems the Eastern forces concentrate in the Rheinland, ready to attack France. Then it is time to get these into service to defend their homeland.


You may know this kit from a previous post, it is the Master Modell 1:100 Dassault "Mercure" which got a closer look in this post. Pictures of the built modelkit can be found in this post.

This was built in a typical manner, some sand, paints and flock, and voila, it was done. Of course, this did not went fast, I spent the whole Sunday on these pieces. Two pieces were already started and two more were built from scratch.

But I wanted something more. I had some flickering LEDs and wanted to install them into some of the wreck pieces. I improvised the LED holders using some metal and LEGO parts and much glue and brought them into place with my trusty hotglue gun.
These things look creepy but they do their job well.

The the rear "smokepiece" is removable to reach and change the battery of this thing. LEGO pieces are used as connectors and this works well. Also a switch was added.

When everything was in place, I added some "smoke" using cotton. This made a little mess, but in the end it works as supposed. Then I gave the cotton pieces a fat layer of clear varnish to add some strenght to the cotton followed by some black to darken the smoke.

How this thing looks now, when it is finished, can be seen in the video below:


Originally I planned to post yesterday, but I was in the mood to continue the work on these pieces and to prepare them for today. I hope I will be able to finish and upload the BM-13 and Katyusha posts tomorrow, since they are roughly finished it will not take too much time.

Todays roguish Montagmaler session was nice. While my mate Olli gave one of his tanks a fine paintjob, he painted a very nice German camouflage pattern, I built the electonics for these scenery pieces.
Even when I was sceptical while I worked on them yesterday, the result has a pleasing appeal, and I can not wait to see them on the battlefield.

June 18, 2018

Reworking Some Old
28mm Amera Ruins

Some weeks ago I started to rework my Amera ruins, which I built some years ago. I was never really satisfied by the results of the paintjob I did that time.
The British manufacturer Amera Mouldings offers vacformed polystyrene ruins and other stuff in different scales for a fair price, but the building is tricky, once you got it built you would have to reinforce the parts because the whole construction offerered various weaknesses. And the parts lack of fine details, maybe that is the reason for the pricing.

This is (almost) how the ruin looked before I spent some work on it. First I painted the walls with a random green tone. I have no picture of the original color of the wall, but it was like it was on the other two ruins in this post.

I added some edges which got sanded I also added some pieces of cork. Then I glued sand on some of the ledges of the windows.
Spots where the walls got damaged got some grey just as the edges of the walls.

The next step was adding some colors. First I drybrushed the outer walls. Then I followed this tutorial and added smokestains with my airbrush to the give the building a burntout look. I did this for the inside too, and then the whole ruin was sealed with a heavy coat of matte varnish to save the paint from damages.

The next step was too add some color to the ground. I choosed brown to match the bases of my minis.

Now came the steps I did not do pictures of, but after the brown dried, I applied a selfmade black wash, and when that was dry I drybrushed all brown parts with beige, followed by another strong sealing coat of matte varnish.
The last step was to add some flock and gras. I mixed woodglue with matte varnish and it had no glossy finish when it dried. I do not know where I got this tip, but it works.
After that a last heavy layer of matte varnish was applied to give the flock stronger bond.

And now it looks like this...


The rope is made of wire to give the players access tho the upper levels of the ruins.

I am very satisfied with the results, it looks great. Just as the two ruins I already finished.
Here is like they looked before...


And after some work they looked like this...

 
Rebuilt just as the other ruin. The boards on the windows of the smaller ruin are popsicle sticks. I added some heavy texture with a ballpen to it. Everything else was done just like at the other ruined building except for that I used an other beige for drybrushing the ground, but the does not matter.

I am pretty happy that this turned out so well. The next three ruins are prepared to get painted, I would like to do that now, but I do not know how loud my compressor is for neighbours.

Maybe I will finish them tomorrow after work, that would mean I would have to visit my hobbystore before to get more supplies, but my airbrush and my trusty hairdryer will save a lot of time.

May 26, 2018

Just Some Pictures
I Found On My Phone

Scenery contruction pictures from the last year. I found them while I was browsing through the backup from my phone. 

This is our river piece from this post. I found some pictures of it's construction:


The river piece in w.i.p. status. I hotglued some layers of cardboard pieces (leaving a gap) on a 120x30cm (roughly 4x1ft) piece of Styrodur (foamed polystyrene), then I filled the edges with acrylics. The gap, which should become the river, was filled with two component epoxy, in which some blue color was added. After that, the stones were added while it was still sticky.
Then two bridges and some more details were added as you can see in the first picture of the post.
And then there were some more pictures of an other scenery piece I made with my mate Olli.


This piece is a coastal segment, sized also 120cm width and built from Styrodur. It is planned as a D-Day element and can be set on any of our 120cm wide battlefield elements. While it looks almost finished in the last picture there will be a lot more work to spend on this section of the battlefield.
We were thinking of adding one or two bunkers and some obstacles at the beach, maybe we find some nice pieces at Thingiverse. And a small strip of blue paper needs to be added to represent the sea.

At the moment I enjoy the Friesian summer, waiting for an order of bits and bats to continue the work on my Rügen'46 project. When it will arrive things are going to get a little weirder.
Since I must pickup a small bargain from the bay, tomorrow will be no modelling on my modelling sunday, but I think I will find some time for a closer look at something.

January 17, 2018

3Dprinted 15mm Scenery
for
TANKS, Flames of War and other games


This "kit" came fresh from the printer when I made the picture, the brim element is applied. I downloaded the .stl file for this house from Thingiverse.
It was made in 28mm scale but I scaled it down 60 percent to make it roughly fit into 15mm scale.


After removing the brim elemant and separating the parts I was positively surprised about the quality of this print, even the wooden structure of the doors very good to see.


After a little sanding I used cyanacrylate glue (I hate this sticky shit) to build the pieces  to one whole piece. The roof came from a old H0 model house kit. I am not too satisfied with the door, I think it will be replaced by another door, but the rest of the house is fine. The mini and the tank are made by Battlefront Miniatures in 15mm scale.
I will add a base with some interior before  this model will get painted.


A small update on the printed T-34 hulls, I applied the basecolor. The next step will be a layer of drybrushing before I will add a black wash. Maybe I will do some highlights after it, but I have to see the results of the next steps.


October 18, 2017

The New Battlefield
(Work In Progress)

After some hours of work we finished the smaller piece with the bridge. The large piece got some streets and parts of an airfield but we did not finish it.

The whole battlefield
The connection piece with the 2 bridges

The center of  the new part of the battlefield

The airfield

Soviet tanks approaching the river

Time To Build
Some Scenery

 Today's mission is to continue the work on the next playfield elements for our TANKS games.


The large piece will get some streets and an airfield on the bottom, the piece in the middle will have 2 bridges above its river, and the piece on the left is some kind of simple beach that needs only some finishing touches.

At the moment we are playing on 1x1 meter, after finishing these pieces it will be 2,5x1 meters what means that we will be able for a big 2 vs 2 match with 500 points per side.

I just wanted to show how it is looking now, tonight I will post pictures of the progress we hopefully will do today.

February 22, 2010

Factory Hall -
Made Of Foam Board

I finished my first foam board building just one moment before but now it is late and I am tired of this weekend that I will not write too much about the built. I hope the pictures are self-explainig.Here is a step by step report of the built.


The tools I used.

All windows and doors are drawn in.

This is how it looks after I cut it all out.

The building glued on a base.
The edges were cut to give it a ruined look.

The first paint progress.

I forgot to work on the corners before I started to paint it.
The corners are made of matches, I filled the gaps with acrylic putty.

The building is finished.

I used grey as base color.

After that, my selfmade wash was used to give it an used touch.

I think it looks good. Tomorrow I will build the next buildings for my little "Papergrad".
(This post was powered by Krombacher)