June 26, 2018

Faces Of War (4)

 
Some more pictures my grandfather made while he was taking part in the African campaign during ww2. I even did not went too school, when my he died, so I never had the chance to ask him about that time. It would have been very interesting what his story was.

 
I don't know if I wrote that before, but the pictures were hidden for some decades in a desk until my grandmother died and we cleaned her house.

Her wartime stories were very intense. When she told me about the struggle in the last days of the war to get from the region arround Munic, where she had to build planes for the regime, to her home in the region of Eiderstedt, I felt that some dark memories came back to daylight.


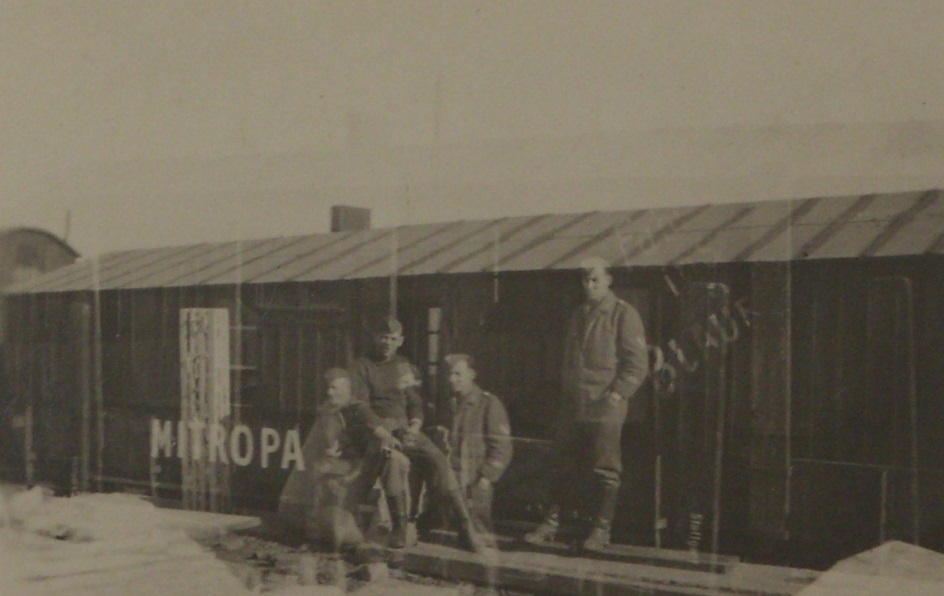
Seems like the last picture got lighted(exposed?) twice.
I am still not able to say where all these pictures were made except for the fact that the war happended in Northern Africa. I would have to get a map of Europe and the northern part of the African continent, then I could use the distances from this picture, draw some circles, and have a rough spot, where this signpost was standing. If I am not wrong this is called triangulation (?).

There are some pictures of monuments and special places, maybe one day I will identify some of the locations like this:


Creative Commons Lizenzvertrag

Dieses Werk ist lizenziert unter einer Creative Commons Namensnennung
 - Nicht kommerziell - Keine Bearbeitungen 4.0 International Lizenz. -

...by the way, I finished three more Amera ruins, there is only one ruin left to rework. This will be a bigger task, since it will be a mission related building and has to get additional rooms and structures.

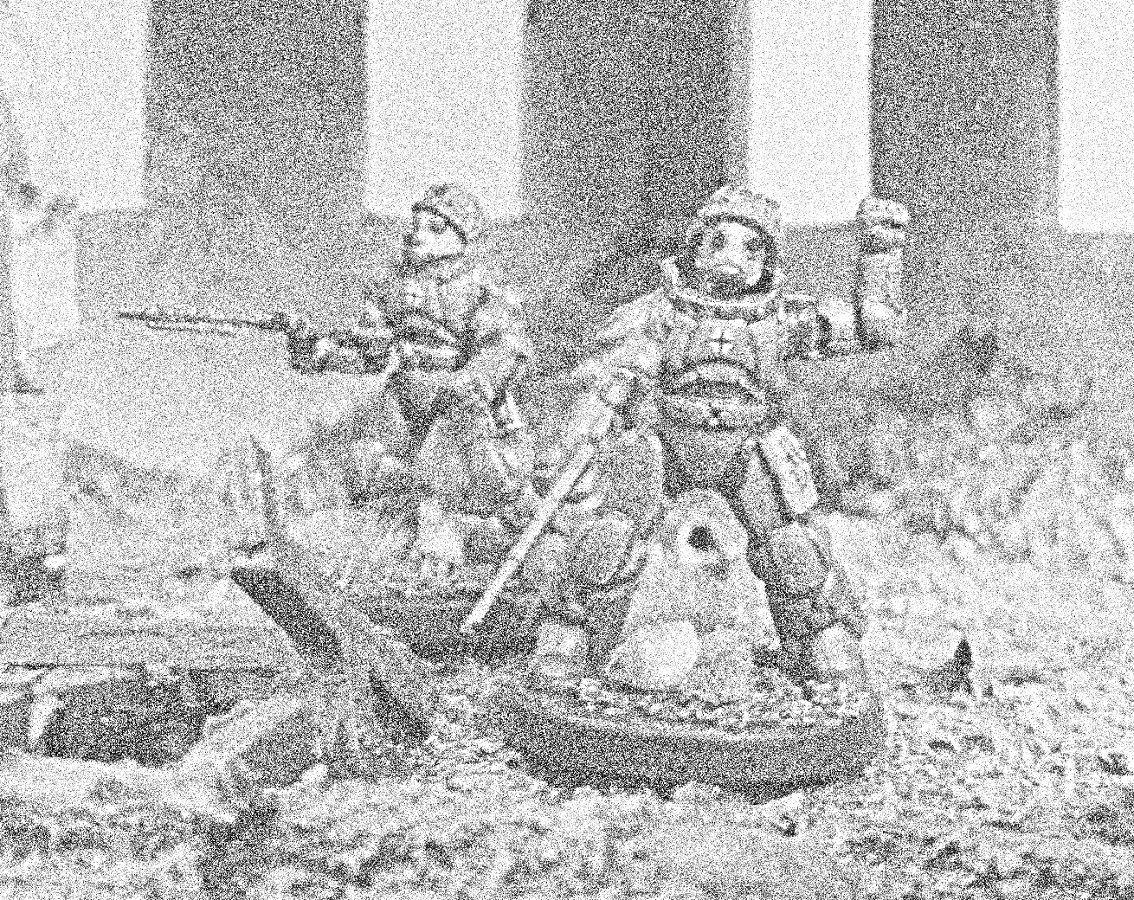
In one of the earlier posts I wrote that I was almost finished with the figures. No, I am not.
The plan is first to play a small map with two minis per player, a fighter and a technician, to get them understand the basic rules. It will be a dungeon escape with different exits, these minis are painted and ready.

After the escape, and a pause, the several teams will unite with some squads, and then the "cooperative" game ends. From then, each player has to reach its goal on the streets of Sassnitz.
Squads for three players are finished but there are three more groups to do, roughly about 20 minis, today I started one of them, on the bench are the Siberian veterans on which I too a closer at some weeks before.

June 18, 2018

Reworking Some Old
28mm Amera Ruins

Some weeks ago I started to rework my Amera ruins, which I built some years ago. I was never really satisfied by the results of the paintjob I did that time.
The British manufacturer Amera Mouldings offers vacformed polystyrene ruins and other stuff in different scales for a fair price, but the building is tricky, once you got it built you would have to reinforce the parts because the whole construction offerered various weaknesses. And the parts lack of fine details, maybe that is the reason for the pricing.

This is (almost) how the ruin looked before I spent some work on it. First I painted the walls with a random green tone. I have no picture of the original color of the wall, but it was like it was on the other two ruins in this post.

I added some edges which got sanded I also added some pieces of cork. Then I glued sand on some of the ledges of the windows.
Spots where the walls got damaged got some grey just as the edges of the walls.

The next step was adding some colors. First I drybrushed the outer walls. Then I followed this tutorial and added smokestains with my airbrush to the give the building a burntout look. I did this for the inside too, and then the whole ruin was sealed with a heavy coat of matte varnish to save the paint from damages.

The next step was too add some color to the ground. I choosed brown to match the bases of my minis.

Now came the steps I did not do pictures of, but after the brown dried, I applied a selfmade black wash, and when that was dry I drybrushed all brown parts with beige, followed by another strong sealing coat of matte varnish.
The last step was to add some flock and gras. I mixed woodglue with matte varnish and it had no glossy finish when it dried. I do not know where I got this tip, but it works.
After that a last heavy layer of matte varnish was applied to give the flock stronger bond.

And now it looks like this...


The rope is made of wire to give the players access tho the upper levels of the ruins.

I am very satisfied with the results, it looks great. Just as the two ruins I already finished.
Here is like they looked before...


And after some work they looked like this...

 
Rebuilt just as the other ruin. The boards on the windows of the smaller ruin are popsicle sticks. I added some heavy texture with a ballpen to it. Everything else was done just like at the other ruined building except for that I used an other beige for drybrushing the ground, but the does not matter.

I am pretty happy that this turned out so well. The next three ruins are prepared to get painted, I would like to do that now, but I do not know how loud my compressor is for neighbours.

Maybe I will finish them tomorrow after work, that would mean I would have to visit my hobbystore before to get more supplies, but my airbrush and my trusty hairdryer will save a lot of time.

June 16, 2018

Westwind Productions
28mm SHS
Seperate Head System
(2)

A closer look at some heads from the SHS range of Westwind Productions. Westwind offers a large selection of heads for the Secrets of the Reich figures they are producing.
SOTR is a Weird World War Two 28mm tabletop game, this link gives you a very good descripton of the game, even when it is only available in German language. The google translation into English is here.

This time let us take a closer look at the two other SHS sets which I ordered. My first look at them can be found in this post.


On the left handside you see the contents of SHS-SOTR6 "Zombie Heads B" which contains 20 Zombie heads and on the other side you see the contents of SHS-SOTR15 6 "Soviet Zombie Heads B" which also contains 20 Zombie heads.


Since I do not have approciate heads for a comparison, I gave some heads a rough coat of color and a wash to highlight the details. The upper sprue belongs to SHS-SOTR6, the sprue below came from SHS-SOTR15.

The casting quality is as good as the details are, there are some small remains from the casting process but not much more to clean. The overall look of the heads is better than from the two other sets I own. The mm grid of the cutting mat may give you an impression of their size.
But as you may have seen, the heads are more 28mm truescale, even when the heads from SHS-SOTR6 may be slightly bigger.

I temporarily mounted some of the heads to some Warlord Games and Wargames Factory German infantry figures just to get an impression how they will look when attached to a body. I just had them in range, be sure they will be glued to more aquedate figures.

All in all, the heads are nice, the sculpting and the casting is good. I just copied my resumee from my first post about the SHS heads:
[...] even when I thought at the first look that the heads were two small, I think the the heads fit very well. Especially when you use less heroic scaled miniatures [...]

I just came just work, added these lines and am happy that I prepared most of this text yesterday. After some chilling I will continue my work on a Amera ruin, what I will capture for a future post.
And maybe I will start to build some minis from the "Siberian Veterans" box, either as soldiers or as zombies.

June 14, 2018

Just Ranting,
WTF Is Rügen'46 ?

I was asked by a friend about all this Apemutation-Zombie-Sassnitz stuff, and here they are, the roots of Rügen'46...

Last year I painted some nazizombies (see this post) while my mate Olli was working on his tanks. Do not ask why I built them, maybe I watched "Dead Snow" or some shit like it before. It was our first modelling session, happening on a Monday, since then we call ourselves ironically Montagsmaler, even when we never met on Monday again.
While painting we were talking about this and that, and my blog was one of the topics. I had not posted for more than six years for several reasons.

Maybe now should be the right time to continue posting, I restarted modellbuilding almost a year ago from that. And the zombies which I was painting could be a nice start.

We were talking about the minis and I gave Olli a small overview of this "What if..." weird World War Two concept, showing him Heer46, Conflict47, Dust, and stuff like that.
And soon we were joking about the ridiculousness of all this stuff, remembering weird movies like "Oasis Of The Living Dead" from our youth or wackos believing in stuff like "Die Glocke" and all that weird shit. Yes, naziscum sucks.

But a restart of the blog, would mean that I wanted a "stylish" label for all this www2 stuff, and I can not remember who of us said it first but suddenly the words Rügen Sechsunvierzig appeared which were worth some good laughs.
I think it was "Rügen Sechsundvierzig, die letzte Bastion", what made me spill my drink over the desk in a heavy laughing attack.

As you can see, I continued this blog. I made some years pause with modelling, but at this time I restarted to build models at least for a year. It is still a nice compensation after a stressfull day at work.

Time went by and some more Rügen'46 posts appeared, but I had still no use for all this stuff. To be honest, I do not have any displays for my finished models, I just store them in boxes. And I am not much in wargaming except for a game of tanks once a month.
I just like the figures.

But then I found this blog, stole shameless some ideas, and suddenly it all made sense. I would host a small gaming session at my birthday party. Just like the people at X-acto Science have done before.

Knowing that this would be a hard task, since Olli is the only friend of mine who is interested in tabletop gaming, I had to give it a nice feel and look that my other friends would not be too annoyed by it. Now it are only some weeks to go, and I revealed my plans to all of them, at least they may be prepared of the things to come.

Finding a ruleset "for dummies" was easy, we are going to play a heavyly modified (dumbed down) version of "Combat Zone", some years ago I picked up an English starter from EM4, a year later I got the German version from the bay and the rules are not too complicated for beginners.
But I know I have to dumb them down, experiences from our 2vs2 game of TANKS clearly showed one thing, don't drink and drive.

Finding a good background story was not a problem too, as you have read above, I will take my www2 stuff, write a simple background story and design some factions. And this went well.

Just to give you a plain overview, the world of Rügen'46 is totally screwed up.
Things went as known until the spring of 1946 when something happened at Sassnitz on the island of Rügen. From this point everything changed. The western allies flew from the continent, only appearing as merceneries in the troops of the remaining forces who survived the incident. Ressources are rare, the dead arised, strange things were invented, and an unexpected enemy rises again.

Since I do not want to spoil it for my friends, for more detailed informations about the background and groups of the Rügen'46 universe you will have to wait, it will comesooner or later.

In the meantime I will continue my work on this project, most of the modelling work is done now the paperwork is next. 

June 13, 2018

More Bitsrecycling
With The 3D printer

Building a matching tank for Mariya Oktyabrskaya in 28mm is a little pain in the ass. If you are orienting on the picture in this post, the choices of 28mm/1:56 tanks are limited.

I made my decision for the Rubicon model kit of the T34/76, but even when there are two different turrets to use, the turret from the picture I mentioned before was not included.

Since I like the Mickey Mouse-ish look of the hatches I had no other option then to get  my hands on the Rubicon T34/85 kit because the matching turret is included as a bonus in the kit.
And guess what I did...

First let me say, both kids are great. No sinkholes, no flash, and clear instructions. The builts went without any problems. And the finished tanks are looking great. At the moment they are primed with AK Interactive Russian primer, I like this stuff, but it needs some time to dry/harden.
I am still unsure which color I may use, but maybe the 85 model will get a camouflage pattern.

But now the struggle began, I had not only two completed tanks, but a big bunch of bits. Two unused turrets and a almost complete pair of tracks had to disappear in the bitsbox.

As you may know from earlier posts, for me this fact is totally annoying. So I browsed through the files at Thingiverse, trying to find a T34 hull to use with the leftover bits.

And I found this T34 and printed it. At the first try I messed up the scaling, the first print was way too small. On the picture below you see the result of the second print. This hull took 9 hours to print, the fitting parts took two hours to print. The hull is 5mm longer than the Rubicon hull but I do not care about this, it is still looking fine.


Sorry to say that I forgot to make more pictures, I just tried to do, but my camera is out of batteries, and the pics made with my mobile kind of suck.

That is why I split this post in two parts, in the next days the second part will follow with some pictures, to show how I will attach the tracks and the turret to the new hull.

But let me finish this first part with the gained knowledge from this "campaign", maybe I should have gone for a 1:48 kit of the T34 since the Mariya Oktyabrskaya looks a little oversized on a 1:56 tank.

Rügen'46:
Stoppt die Eindringlinge !!


Another Rügen'46 post? 

This time it is Reaper Bones' Sister Maria and a companion.
Since not only the remains of world's governments strife through the ruins of the devastated city of Sassnitz, the forces of the Vatican may be seen in various raiding parties.

The mini got painted in a very simple way, I even did not use white on the collar, it is still the color of the material. The main color is black with no shadings or highlighting. Depending on the source and angle of light, I like the look of natural shading on this figure.

Next is Indiana Jones' unemployed cousin from the South a.k.a. Frank Buck. Adventurers from all over the world are joining the opposing forces for great reward, just as this guy, but are they trustworthy?
He was painted in various beige and brown tones followed by a Army Painter soft tone wash. Then I painted the hat and the face/hair.

The nun and the adventure rare made by Reaper miniatures who offers with it's Bones sortiment a big range of miniatures for a low prices. The reason for this is, that the miniatures are made from some kind of PVC. They are pretty soft and the details are very soft. 

I hope the paint will stay on these figures since they will be in heavy use in some weeks. I am concerned about the soft material, some paint may split off.


One miniature from the British Snipers set of Warlord Games' Bolt Action range. Human ressources got rare since the incident, highly trained marksmen from overseas can be seen in any of the conflicting groups which are the remaining since the collapse of the civilisation.

I like the look of his ghillie suit, and the paintjob of it went pretty uncomplicated. I used green as basecoat, then I used two more green tones to paint some of the patches of the suit. After that I only added a wash with Army Painter soft tone before I went on the rest of the figure.

Last but not least a picture of two minis from a previous post. I planned to rearm them and since I got the excellent weapon sprue from the Warlord Games Siberian veterans, I got some matching handguns.
The female miniature got a new revolver and the male figure got a complete new hand with gun. I cut away the old parts and glued the new arnament to the mini.

Since I am pretty wasted at the moment, since Mr. Burnz got his birthday today. I am happy that I made this post some days ago, don't think this would work well at the moment. There is still one more post (almost) ready, which will be online tomorrow, but in the meantime I made some more weird stuff, enough material for some future posts.

If there are heavier mistakes in ma bad English than usual, please excuse this rare circumstance I will fix it as soon as possible. But now in this moment.

June 11, 2018

Rügen'46:
Механизированная
пехота обезьян
(and some 3D printed stuff)

Since the Rügen Incident, things went bad in Europe. Findings from various artefacts did not solve the question what happened on the island and it is still unclear what hides beneath the ruins of Sassnitz.

But what was found pushed scientific progress beyond known borders....

Mechanised Ape Infantry (M.A.I.) which is one of the results from cruel experiments in the bunkers of Stalingrad, also known as "Ape-X" from Reaper Miniatures' Bones range.
Reaper offers with it's Bones sortiment a big range of miniatures for a low prices. The reason for this is, that the miniatures are made from some kind of PVC. The material is pretty soft and the details are soft.

On both minis I modified one arm. I cut and reposed the arm, then the resulting gap was filled with Greenstuff, in which I sculpted a fur pattern with my hobbyknife (called cuttermesser only by professionals). If I would not know, I could not say which arms were changed.
Also both miniatures got a new 3D printed 50mm roundbase, since I did not like the look of the bases attached to them. The bases were printed with the same setting than the stuff below, and took 50 minutes to print for each of them.

I finished the miniatures with a simple but effective paintjob. When these creatures will be used for future games they will count as light tanks.

While I painted the miniatures, the 3D printer printed some movement trays from Thingiverse. They will be a nice addition for games or maybe even figure storage.

By the way, I think I never mentioned that we are using PLA as printing material.


The movement trays were printed with 100% infill at 195 degree celsius, with a print and movement speed of 50mm/sec. Printing one of these things took about an hour, after that I added some sand and my standard base colorset to make them match with the bases of the minis on it.


And as you can see, the new movement trays look decent and match perfect with the bases.

June 10, 2018

15mm German
Tankhunters

A bunch of 15mm German vehicles I finished. All were painted in the Hinterhalt camouflage pattern which I use for all of my German tanks.


This is my Sd.Kfz.234/4 from Battlefront miniatures, some years ago I built one of these in 1:72.
I bought the TANKS version of this model which offers four different options to build. If you want to use it for TANKS, you get two different tanks you can use ingame, but you have to decide which version you want to build.

I built the Sd.Kfz.234/4 from this kit. Seeing the stats of this unit it may be an good option to use.  After some Google search I found out that it is not too complicated to build this kit that you can use all four possible versions, but I decided not to do this.

Instead, I turned on the 3D printer and made myself a Puma wheeled tank. Since I did not want to post about 3D printing this time, there is no picture of it

Seeing all the bits that are left over, maybe it is time for some more creative bits recycling like I have done before.


Three Sd.Kfz. 139s, built from bits from the Plastic Soldier Company Marder III kit and 3D printed hulls. Some lines about the construction can be found in this post. If you compare #1 and 2 and the number 3, you will see, that I used different settings on the 3D printer.

Some minor parts like the exhausts and the storage boxes of the number one and two had to be built from scratch, but after the paintjob they look great from a certain distance, but in close look you see the messed up details.


Two Marder III from the Plastic Soldier Company Marder III kit. I had to choose which tank to build from this kit because it offers three different tanks to build from.
I built the Marder III from this kit, I like it's shape. And I am pleased with the results. Both tanks have a different finish, even when I used the same paint, maybe it comes from the fact that I sealed one by hand while I sealed the newer one with the airbrush. And maybe it got a little too much matte paint

Today I started to rework some ruined buildings from Amera Plastic Mouldings. This will be much to do, but using my airbrush saves a lot of time.

June 9, 2018

Rügen'46:
Нападающие,
готовые к атаке

Last weekend I spent some time to rework the Plastic Soldier Company Russian infantry I painted a while ago. Even when I was happy with them when the were finished, in the moment I saw the Westwind Production SHS heads, see this post, I knew what would be to do with them.

I messed up the pictures.
 there are six figures missing and 
six figures two times on the pictures above

Heads were rolling like at the French Revolution. After all minis were headless, I drilled holes for the new heads, which were glued with UHU Hart. This fine stuff needs some time to dry but after it is dried there is a strong connection.
The modifications went without big complications, the most heads were easy to remove, some poses needed more efford, because of some hands and guns attached to the helmets.
I wanted to save some time, that is why the minis in firing poses look a little weird. But I did not want to repaint the whole mini, what I would have to do if I had to pose the gasmask filter a little more appropriate.

The paintjob was fairly simple. The mask, tube, and filter were painted with Revell Aquacolor. Then I made two black dots for the eyes, followed by a lighly thinned black wash. The helmet was painted before I sealed the new head.
Luckily there was almost no damage to the paint at the necks where I removed the heads. I used AK Russian primer for the new heads, that color concealed all messed up spots arround the necks.

Finally I found a use for my (weird) ww2 styled miniatures, and are only four weeks to go before these guys will roam through the streets of Sassnitz. But before they can do this, there is a lot of work to do.
Tomorrow is Sunday what means: turn off the mobile, ignore the doorbell, time for some models to build or paint. This time I have a clear goal, I have some built Amera Plastic Mouldings ruins in the basement that will get a new look.

Komm, wir gehen
nach Panama

Yesterday the Montagsmaler went rogue and met, even when it was Friday. My mate continued the paintjob on his German tanks, last week we removed the old paint, basecoated them, and gave them a first layer of paint.
While Olli removed the masking tape from his Tiger, the tank's paintjob looks somehow like the Tigerente from German children's book author Janosch.

At the moment I am preparing a handful of post for the next days, a lot of stuff piled up in the past few days that a I would like to show you.

June 3, 2018

Warlord Games
28mm Siberian Veterans
for Bolt Action


A closer look at the 28 mm "Siberian Veterans" made by Warlord Games for their game "Bolt Action". The box contains enough plastic and metal parts to build 34 figures.
By the way, at the moment I am not interested in Bolt Action, but I always can use some more Russian soldiers for future projects.

First a look at the plastic parts, if you want a "real" review, you may stop reading now and search something better on google, here I only take a closer look at a pretty random piece from my collection to give other potential buyers and collectors  pictures and some basic informations.

The plastic parts are the same sprues as in the "Soviet Infantry" box from Warlord Games. There are four identical sprues for the figures, from each frame you can build 8 figures. There is a variety of heads and equipment as you can see on the picture.
Then there are 3 identical sprues with Soviet weapons. They offer a great selection of pistols, rifles and automatic guns, this will not only be useful for equipping Soviet soldiers.
Also there are a sprue with 25 bases, six single bases and the instructions leaflet. When you build all figures from the box, there will be some bases left for the bitsbox.

But I mainly did not buy this box for the plastic parts, so let us take a look at the more interesting parts that came with this box:

First of all there are two metal miniatures, a Soviet comissar using a megaphone to motivate the troops, and a soldier pulling a Maxim machine gun.

The new heads for the veterans. There are two different versions, you get two of each what makes 24 heads. This is not enough for the 33(34) minis from the box , but maybe the rest of the plastic Soviets will get zombified.
Not only I ordered the heads from the last post, there are still two boxes of SHS heads I want to show you in a future post.

A sprue with five backpacks and the first three pairs of arms, the first equipped with a carbine with bayonet attached, the second pair holds a German MP38 or MP40, the last pair of arms is holding a carbine with a rifle grenade. This is a nice addition
The last two items on the picture are an arm with an ammo box for the Maxim machine gun, and an arm holding a knife.

The final picture shows the sprue with the rest of the arms. This sprue contains four pairs of arms, two with carbines and two with the PPSH machine pistol. Just as all the other parts they are a bit of heroic scale but they do not look like boybuilders.

The plastic parts are the usual great quality as all plastic minis Warlord Games offers for their Bolt Action range.
All metal parts will need some cleanup to remove some minimal mould lines and the residue from the casting process, but  the metal figures are nicely modelled and casted without any flaws, just as the rest of the metal parts. The faces of the heads may look a little cartoon-like but I like that.
All in all, this box offers a great value for its price. When you build all miniatures, you will have plenty of bits for other projects, especially the weapons sprues are very useful for every Eastern Front project. This shall not be a review but thumbs up for this box, I can only recommendate this box.

The Friesian Summer is still ongoing, my arm is better now, and tomorrow is Sunday, which means I will spend my time on some models. I still don not know what I will build or paint, but the Sunday is reserved for it.