Showing posts with label Useful tools and ideas. Show all posts

September 28, 2019

Model Storage

At last I found a way to store at least my 15mm models properly. Some days ago I was at a local discouter and found these boxes. I took the opportunity to get some of them for my minis, these things cost 1,99 € what is ok, and, what is important, in these boxes the models should be protected from (my eternal enemy) dust.

From a friend, who is musician, I got some accustic foam, he did not need this stuff anymore but I can use it for the bottom of the boxes to secure the models as you can see on the pictures above.
There was enough for the (first?) 10 boxes, if I would need some more of this stuff I could get it from him.

Each army got its own box plus two boxes for all planes and helis, on the picture above you can see my cold war US tanks (and a batch of Heinlein books), but since I ordered another dozen of Zvezda "Art Of Tactic" expansions (the whole range will get a closer look in the future), I may need additional boxes, some of them are already full.
At the moment the helis are stored sub-optimal, I wanted to glue some coins or stuff like this to the cover of the box, to attach the magnetized rotors on them, but most of the glues I already tested did not stick. And I should get a separate box for all heli and plane bases.
But all in all I am happy with this solution, and while I sorted my models to the new boxes, I noticed that I have a lot 15mm models, more than we will ever use for games, but I like these small things, and I will add more 1:100 models to my collection.

While I had a flue last week, I was not in the mood for any modelling or blogging, but last Thursday I was fit enough for another roguish Montagsmaler meeting. My mate Olli finished his Tiger 2 and started to paint another tank, while I painted several tank crews and some of the kits which I still want to review, luckily I made all pictures which are needed for this before I started to build them.

This weekend is dedicated to modelling. At the moment I have one half of Ollis 15mm Bundeswehr platoon on my bench, these kitten got an additonal layer of matte varnish and he left them here to dry. The new Vallejo matte varnish I use is great, works fine with the airbrush and the paintbrush

Just a random Montagsmaler picture:

At the moment I am planning what I will post the next days, I think it will be the Zvezda Sd.Kfz. 186, Ollis Bundeswehr models, both Italian expansions for "TANKS", and some ww2 pictures. I still have 4 "TANKS The Modern Age" expansions laying on my desk which I want to (mini)review, but one thing at a time.
Too bad, I already built one of them without taking pictures of the sprues. But I will improvise when it is time for the closer look at that kit. Not to forget to mention all the new custom unit cards I made in the past few days.

I just came home from work but now it is weekend and you can expect another post tonight, then I will take a closer look at the Sd.Kfz. 186 for Zvezdas "Art Of Tactic" wargame, I only need to take a picture of the finished kit and write some lines, the rest of the post is almost finished.

May 6, 2019

My Method To Apply
Camouflage Netting
To Tanks

Building a kit out of the box makes fun, painting the finished kit gives you something special, but adding some extras and modifications will make the finished kit to a true unicate. In this post I will show you, how I apply camouflage netting to tanks. This method was found some years ago in an old forum, which does not exist anymore, now I had the time to test it for myself.

You do not need much to do this modification, you will only need a model of your choice, some Greenstuff and a needle.

First I mixed the Greenstuff, then I applied a flat patch over the designated spot. For this demonstration I used an old Italeri JS-2 fastbuild kit. It comes from the testbox, where I have some old models on which I test new methods of painting and modifications.

After that I used the needle and started to push little holes in the flat surface, you do not have to worry about this process, just keep pushing. Whith the needle you can trim the form of the net if you want to.

The whole procedure took about 5 minutes and the result is promising. Please note that this is only a testpiece, do I did not put too much efford in this.

On the picture below you can see a slightly modified 1:100 Zvezda M2 Bradley APC (inspired by this blog) with some camouflage netting applied and already basecoated, with a layer of paint this already looks great. I am curious how this will look when all colors and decals are applied.

As you can see, some modifications for models do not take too much efford and look great in their results. The Bradley above will get his NATO woodland camo pattern, then I will decide in which colors I will paint the new applied camouflage.

May 1, 2019

More Bitsrecycling
With Instant-Sil

Oops I did it again. Building the Battlefront Miniatures M-901 ITV and LAV tanks left over a load of bits. And as you may know, for me this is annoying, I think it is a waste. Except for the marked pieces all parts of this sprue were leftover once and of this sprue twice.
Sure, sometimes you will get some extra hatches or small parts, but in this case there were so many sparebits leftover, like at the Plastic Soldier Company 1:100 Panzer 38t (these were leftover), that I decided to try to use them like I did in this post.

The main parts were finished and roughly cleaned up. As you may see, the duplicated tracks, skirts and hulls are not perfect but I think they are acceptable. They would look better when builtup and painted.

The quality of the cast could be much better, but with my limited supplies I only got these results. This is how they looked when all parts were attached. Also I had to duplicate the drivers hatch. In the background you can see some of my mates Ollis Leopard 2, this picture was made at another roguish Montagmaler meeting.

Later that day we basecoated more than a dozen tanks via airbrush in a production line that would have made Henry Ford proud of us.

Having a Revell Aquacolor Bronzegrün basecoat, the improvised tanks made a better appearence than thought. On the picture they are flanked left and right by the 1:100 T-55 AM kit by the Plastic Soldier Company, a kit which was also nice to build.


I just made these two pictures, you see my original Battlefront kits of the M-163 and the M-901 side by side with their duplicates. Since I changed my regular matte varnish you can see slight differences in the coloring.
I am happy with them, and their production was pretty simple. Another time I used stuff which would else disappear in the bitsbox. For me, one aspect of modelling was always, that every kit built by every modeller everywhere is a unicate, and these are mine.

And I saved some money for other units, one pack of epoxy putty (2 €) was used for each model, some closer looks at the available French forces for "TANKS The Modern Age" may come in the future, but I am still unsure about that.

March 5, 2019

Bitsrecycling With
Instant-Sil

In my next post I am going to take a closer look at the M163/M901 tank expansion for "TANKS The Modern Age". But in this posting I will jump directly to the recycling of the leftover bits.
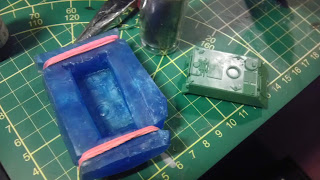
Instead of the 3D printer this time some stuff called "Oyumaru Instant Mold", repacked by pk-pro, was used.

If you are not familar with this thermoplastic stuff, you can watch this video to see how to use it. The only thing I would like to add is, that if you wear 2 or 3 pairs of rubber gloves you can handle the very hot stuff much better.
I used some cheap and pretty fast hardening epoxy, you can see it on the right of the first picture. Milliput and Greenstuff would also work fine but would need more time to get hard.

As a first step I made the mould, my mate Olli made a video of another mold I made to demonstrate how I used the silicone:


The following pictures show what I did after the mould was ready to use.

After the epoxy was pressed in the mould, it was hardened after approximately 30 minutes. Then I took the dublicated part from its mould.

A pair of selfmade tank tracks.

A first testfit shows that the new tracks fit fine.

I also dublicated the front hatch but then I mentioned that I could use the original part from the kit.

The sideskirts were also cloned, the new parts are pretty fragile but almost as thin as the original part.

Now it is getting advanced, I tried to copy a full tank hull. Since the M163/M901 have different tops, I temporarely glued the top of the M901, the version I wanted to recreate, with whiteglue, then I repeated the steps to build a new mould:

When the mould was hardened I had to cut it on both ends to get the kit out of the mould. On the first look the mould looked alright but a closer inspection showed that the temporarely fixed top part of the tank had seperated from the tank hull, what caused a slight deformation of the mould.
But anyway...

I filled the new mould with the epoxy, since I did not have not enough of it, I added a dice into the mass to compensate this.

The part fresh released from the mould compared to the original part. You can see, thanks to the defect mould, one of the edges of the new tank was sunk in.
But that did not stop me, Istill had the original top part which otherwise would not be used.
 
A first dryfit shows that I would have to sand down a big part of the top.

The first layers of the hull were sanded down, one step closer to success.

The top part was glued on the hull, using cyanoacrylic gel glue. The tracks were dry fitted on the new tank, after some sanding they fit almost perfect. Also their thickness was after some sanding just like the original.

The new parts are ready to get glued to the tankhull.

The remaining gap between hull and top was closed with Milliput. Then I attached the tracks and sideskirts. The last part to build was the TOW launcher which was magnetised.

Compared to the original model the dublicated model does not look too bad, you may compare it to a garage kit made from worn out moulds made by an absolute beginner. The quality is not perfect but I like this thing very much, not only because I found a new way to recycle some leftover bits.
When I get a second M163/M901 "TANKS The Modern Age" expansion, I definitely will try this again.

But take a look at the result for yourself.

The only greater fault is one of the tracks. Idid not glue it straight on the hull. When I noticed it and tried to remove fix this, the trackpart broke. Because of that I kept it as it was.

Last but not least, a picture of both finished tanks. The dublicate does not look too bad or does it ? In the next post I will give this kit a closer look.


January 22, 2018

My Method To Paint The
German Hinterhalt
camouflage pattern


In this post I will show you how I paint the German Hinterhalt camouflage pattern. This is very time intensive, I needed for two tanks six hours, but I think it is looking fine.

Step 1:
Apply the three basic colors you want to use. In this case I use sand, green and brown.

Step 2:
Apply dots of sand to the brown and green parts of the tank

Step 3:
Apply dots of green to the brown and sand parts of the tank

Step 4:
Apply dots of brown to the green and sand parts of the tank

Step 5:
Use a light thinned black wash on the whole tank. In this case I use GW Nuln Oil and War-Ter® with a 70/30 ratio.

Step 6:
Give the tank a light drybrush with some kind of bone color/light beige.


The next steps (for that I did not do any pictures) are the following:
- paint all details
- apply gloss coat to the parts you want to use decals on
- add decals
- seal the whole tank with dull coat (still not done)

Maybe some of you readers will try it for yourself, I have still a StuG and a Panther waiting for this kind of paintjob, which I maybe will paint today.


November 2, 2017

TANKS By Galeforce 9:
Optimizing The Gameplay


When we played the last time a game of "TANKS", we had 20+ tanks on the table. All these tanks needed a card for themselves and some of them had equipment cards too. And these cards needed a lot of space that we had to use an ironing board and a makeshift table to lay them out. Several times one of us hit the table/ironing and mixed up the cards.

Now we found a way to optimize the gameplay a little more. On the first picture you see a standard 9 pocket page for trading or gamecards. I cut one row of it and changed it into a little organizer for the tanks. On the second page you see an equipped Persing tank with lots of spaces for crews, equipment, damage and other cards, placed in the 6 pocket page that is unfortunately hard too see.
I think it is a great idea, there won't be chaos anymore, all tanks and their equipment are protected against dirt and "falling damage" and it will not take too much space for the cards.

July 8, 2010

First
Airbrush
Experiences

Since I started with modelling in winter 2008/2009, I wanted to have an airbrush gun because it would make the painting of models much easier especially camouflage paintings. One day I got an old airbrush gun and an almost empty bottle of Revell airbrush gas. But the gun was broken and landed in the trashcan.
I kept the gas to use it in the future and last week I got suddenly a new gun.Today it's so sticky and hot outside, that I decided to stay at home and share my first airbrush experiences with you.


The tools are ready.

The following stuff was used for it:
- my new Revell Starter class airbrush gun,
- an old bottle of Revell airbrush gas,
- color, I use Revell Aquacolor acrylics,
- alcohol as paint thinner,
- syringes to mix the color,
- a "third hand" tool to hold the model (like this),
- a newspaper for covering,

- a cool drink (it's summer),
and, of course, the model that will be painted.


The color is ready.

For this first try I made a mix of 2 parts paint and 1 part alcohol as thinner. I had no idea how to thin it until I found in some internet forums some infos about using Revell Aquacolor for airbrushing. Most of the users there said that Aquacolor matte paints should be mixed with 30 to 40 percent thinner.


The model is prepared.

For the first test I used a model of the WW1 Mk1 tank by Airfix, it came with a lot from ebay but the tracks were broken. But I builded it to use it for some painting experiments like this.
I fixed an small screwdriver with some hotglue on the ground of the tank where it won't be seen when it is finished an found its way to a diorama or something like that. When the glue is taken away this small spot will be painted with a brush.


The model after the first layers of color.

As you can see on the picture above my first attempt does not look too bad, I was positive surprised about the result, it looks good. But I ran out of color and the gas bottle is now total empty. The gun is very good for giving a base coat to models but I do not think that it can be used for camo pattern, maybe with masking tape and/or stencils. But that will come later.


A closer look at the result

The picture above shows a enlarged view of the picture before. The color is still wet and some places got no paint but I am satisfied with the result of my first try. Sure it could be better, but you have to remember that I used low budget gear to get this result.


The color is dried.

Airbrushing is great. It does not cost as much time as painting with brushes and the paint is applied uniformly. I got a new bottle of gas and when it is empty and I made some progress in airbrushing, I should think about new equipment.


The only contra that I found was that it is a big waste of paint, I used 3 ml paint (+ 1,5 ml thinner) for this one, I think I could paint up to 3 tanks with the same amount of color, but with an other (better) airbrush gun the rate of consumption will sink.