Showing posts with label Videos. Show all posts

September 16, 2019

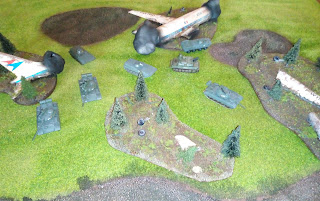
15mm Planecrash
Scenery Pieces

After the Soviet forces crossed the inner German border, big parts of Germany were conquered and sucessfully defended by them, while their allied Warsaw Pact forces rushed forward to reach the French border.

It is still unclear, what happened to F-WTMD. NATO and Warsaw Pact accuse each other. An small East German unit was near while the crash happened and reached the crashsite first.

It seems the Eastern forces concentrate in the Rheinland, ready to attack France. Then it is time to get these into service to defend their homeland.


You may know this kit from a previous post, it is the Master Modell 1:100 Dassault "Mercure" which got a closer look in this post. Pictures of the built modelkit can be found in this post.

This was built in a typical manner, some sand, paints and flock, and voila, it was done. Of course, this did not went fast, I spent the whole Sunday on these pieces. Two pieces were already started and two more were built from scratch.

But I wanted something more. I had some flickering LEDs and wanted to install them into some of the wreck pieces. I improvised the LED holders using some metal and LEGO parts and much glue and brought them into place with my trusty hotglue gun.
These things look creepy but they do their job well.

The the rear "smokepiece" is removable to reach and change the battery of this thing. LEGO pieces are used as connectors and this works well. Also a switch was added.

When everything was in place, I added some "smoke" using cotton. This made a little mess, but in the end it works as supposed. Then I gave the cotton pieces a fat layer of clear varnish to add some strenght to the cotton followed by some black to darken the smoke.

How this thing looks now, when it is finished, can be seen in the video below:


Originally I planned to post yesterday, but I was in the mood to continue the work on these pieces and to prepare them for today. I hope I will be able to finish and upload the BM-13 and Katyusha posts tomorrow, since they are roughly finished it will not take too much time.

Todays roguish Montagmaler session was nice. While my mate Olli gave one of his tanks a fine paintjob, he painted a very nice German camouflage pattern, I built the electonics for these scenery pieces.
Even when I was sceptical while I worked on them yesterday, the result has a pleasing appeal, and I can not wait to see them on the battlefield.

September 3, 2019

3Dprinting Timelapse Video


It took some time, but finally I uploaded a video to youtube. I do not think that I will do this often, even when I have some ideas for hobby related videos, this stuff takes too much time. But at least it is a start and a place to collect all videos I made for this blog. In the next time I am going to upload them to the new channel.
You may subscribe, but I do not think it is worth it, since all videos will be shown in this blog.

Yesterday was the second try of doing this kind of videos, which was not successful, but today I tried again and as you may have seen, now the timelapse thing works, but the quality of the video is pretty bad. I think the camera is the reason, maybe I will try another camera for that. And for sure, a different camera angle, where more can be seen.
And maybe some nice music, without any sound, this is pretty boring.

The file I have chosen for this print was a P-47 Thunderbolt from Thingiverse scaled down to 1:144. Now the Americans will also have the choice of two planes.

The next roguish Montagsmaler meeting will be tomorrow today, oi that video thingi took long, then it is time to get the scenery piece with the crashed passenger jet done. If my mate Olli will build that one kit, a closer look at it may follow in the evening, when we have finished our roguish projects.

March 5, 2019

Bitsrecycling With
Instant-Sil

In my next post I am going to take a closer look at the M163/M901 tank expansion for "TANKS The Modern Age". But in this posting I will jump directly to the recycling of the leftover bits.
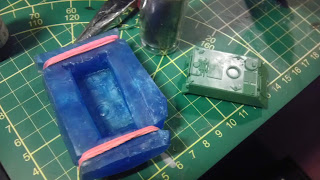
Instead of the 3D printer this time some stuff called "Oyumaru Instant Mold", repacked by pk-pro, was used.

If you are not familar with this thermoplastic stuff, you can watch this video to see how to use it. The only thing I would like to add is, that if you wear 2 or 3 pairs of rubber gloves you can handle the very hot stuff much better.
I used some cheap and pretty fast hardening epoxy, you can see it on the right of the first picture. Milliput and Greenstuff would also work fine but would need more time to get hard.

As a first step I made the mould, my mate Olli made a video of another mold I made to demonstrate how I used the silicone:


The following pictures show what I did after the mould was ready to use.

After the epoxy was pressed in the mould, it was hardened after approximately 30 minutes. Then I took the dublicated part from its mould.

A pair of selfmade tank tracks.

A first testfit shows that the new tracks fit fine.

I also dublicated the front hatch but then I mentioned that I could use the original part from the kit.

The sideskirts were also cloned, the new parts are pretty fragile but almost as thin as the original part.

Now it is getting advanced, I tried to copy a full tank hull. Since the M163/M901 have different tops, I temporarely glued the top of the M901, the version I wanted to recreate, with whiteglue, then I repeated the steps to build a new mould:

When the mould was hardened I had to cut it on both ends to get the kit out of the mould. On the first look the mould looked alright but a closer inspection showed that the temporarely fixed top part of the tank had seperated from the tank hull, what caused a slight deformation of the mould.
But anyway...

I filled the new mould with the epoxy, since I did not have not enough of it, I added a dice into the mass to compensate this.

The part fresh released from the mould compared to the original part. You can see, thanks to the defect mould, one of the edges of the new tank was sunk in.
But that did not stop me, Istill had the original top part which otherwise would not be used.
 
A first dryfit shows that I would have to sand down a big part of the top.

The first layers of the hull were sanded down, one step closer to success.

The top part was glued on the hull, using cyanoacrylic gel glue. The tracks were dry fitted on the new tank, after some sanding they fit almost perfect. Also their thickness was after some sanding just like the original.

The new parts are ready to get glued to the tankhull.

The remaining gap between hull and top was closed with Milliput. Then I attached the tracks and sideskirts. The last part to build was the TOW launcher which was magnetised.

Compared to the original model the dublicated model does not look too bad, you may compare it to a garage kit made from worn out moulds made by an absolute beginner. The quality is not perfect but I like this thing very much, not only because I found a new way to recycle some leftover bits.
When I get a second M163/M901 "TANKS The Modern Age" expansion, I definitely will try this again.

But take a look at the result for yourself.

The only greater fault is one of the tracks. Idid not glue it straight on the hull. When I noticed it and tried to remove fix this, the trackpart broke. Because of that I kept it as it was.

Last but not least, a picture of both finished tanks. The dublicate does not look too bad or does it ? In the next post I will give this kit a closer look.