
Showing posts with label 1:72. Show all posts
Showing posts with label 1:72. Show all posts
September 14, 2019
May 9, 2019
First Sculpting Try

Remember my method to make camouflage nets for tanks some days ago, when I had a little unused rest of Greenstuff laying in front of me.
I tried to create something out of it. To be honest, it was not my very first attempt to sculpt, some of the fur from this undead wolves and a NSFW thingie were made before, but this time I wanted to create something different.
I tried to create something out of it. To be honest, it was not my very first attempt to sculpt, some of the fur from this undead wolves and a NSFW thingie were made before, but this time I wanted to create something different.

As you can see, the back of the "figure" had not seen any sculpting tool, but as also the front did not, it was all done with the needle from the post I mentioned in the beginning.
Making this thing, I call him "Crappy from Innsmouth", took some efford, but I like it and strangely, somehow I am a little proud this piece.
Sure, he is slightly deformed, has no nose and looks more like Pepe the frog with hair than a human, but you can easily see, that it should show something human. Compared to a 1:72 mini and a tank from that scale, hmm, just find your own opinion, but I like it.

Now I will see what is next to do with Crappy, maybe I should paint him, or I could try to dublicate this little sucker with the method I used to dublicate stuff twice.
January 29, 2019
1:72 Modellcollect
Fist Of War
E-75 128mm Flak Zwilling
Fist Of War
E-75 128mm Flak Zwilling

A closer look at the E-75 128mm Flakzwilling, produced 1:72 by Chinese manufacturer Modelcollect. Their "Fist Of War" range includes lots of walker styled tank modelkits and a lot of "What if..." kits. If you visit their homepage you will get an overview about their www2 range.
Let us take a look of the content of the box.
Let us take a look of the content of the box.
Beside the well made full colored construction manual, the box was filled with a lot of sprues.


The first two sprues belong to the main hull of the tank, or whatever you may call this. The cast is very nice without any flaws or visible ejectormarkings. A nice highlight are the tools which are casted as single parts.
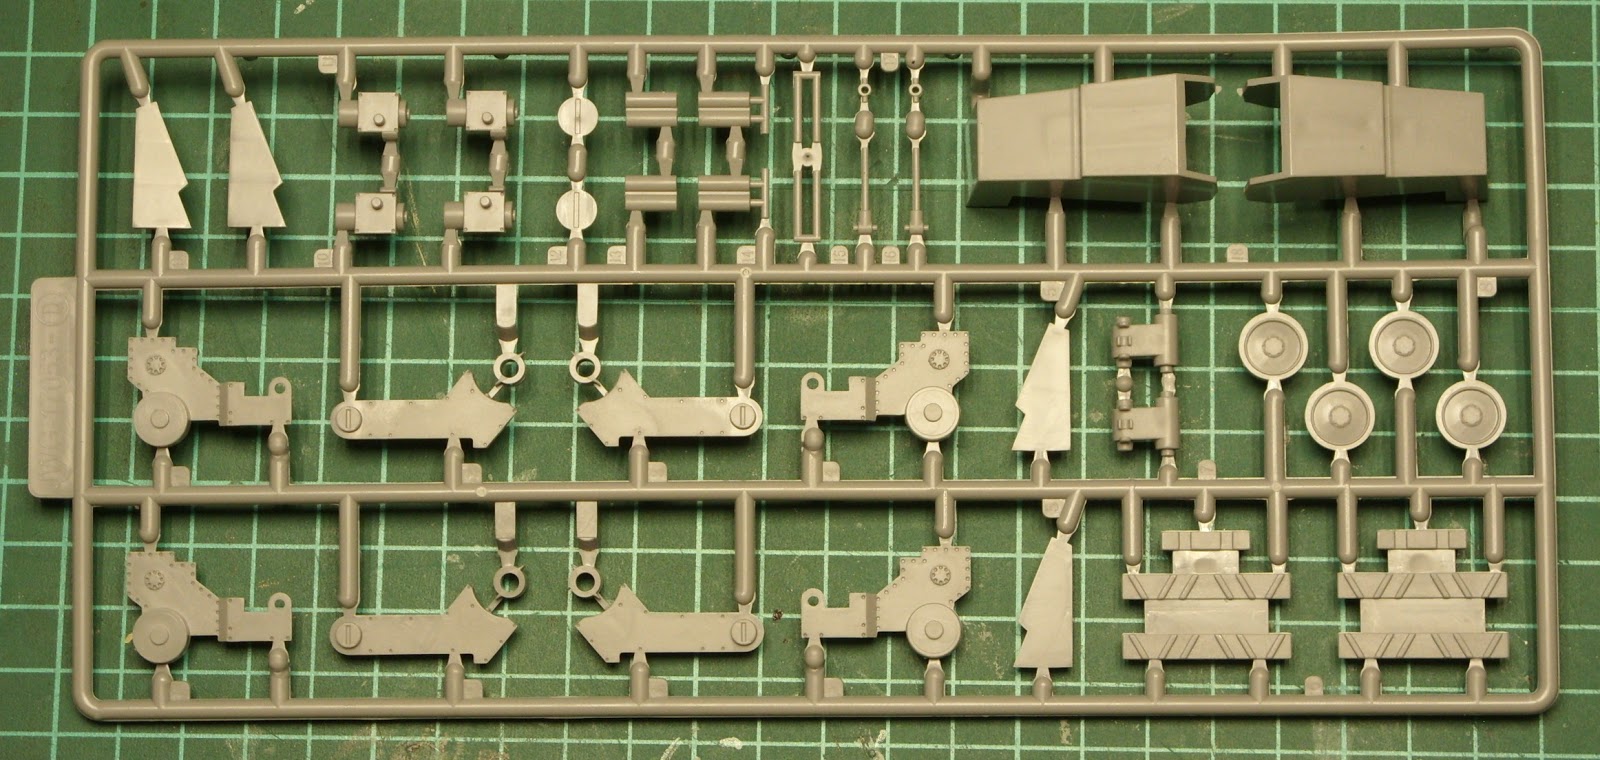
The following sprue is included twice and has all parts to build the legs of the tanks, two per sprue. According the the construction manual, they can be build movable. As mentioned before, the cast is flawless.
The next sprues are for the main arnament of the tank, the 128mm Flakzwilling.


The sprue including the barrel comes twice, the remaining parts for the gun are included in a third sprue. These nice casted parts will sure result in an impressive double-barreled gun.

The final sprue included in this kit includes all parts for the close range weapon of the tank, a Kugelblitz turret at the bottom of the hull. The muzzles of the barrels are finely casted. Using this gun against infantry seems a little overkill to me, but maybe in Modelcollects 1947 some things went different then in our 1947.

Last but not least there is a set of decals included which contains some generic tanknumbers and Balkenkreuze, there are also two pairs of unit insignia decals including custom turret numbers. They will be stored in the scrapbook, maybe I will use them on another kit. This kit will be built without any decals or markings.
This is a nice modelkit, produced in high quality, with a strange weird world war two theme. I can recommend it, seems like it would make a lot of fun to build.
Even if you would not build the kit, you would get a nice 128mm Flakzwilling which could be used as stationary gun for a diorama, and the Kugelblitz turret would theoretically on a Panzer IV hull. And then the walker parts are still left for a kitbash.
January 3, 2019
First Fail
Of 2019
Of 2019

Some armoured Soviet vehicles from Pegasus Models. Painted with Revell Aquacolor, followed by a mild drybrush and a decent green wash. The KV-2s and the BA-6s got some metal barrels from RB Models. I built them some years ago and painted them roughly 6 weeks ago.
Yesterday I wanted to finish the tanks. I added decals from the sparebook, but since I was distracted the whole time by various things, I forgot to add some glosscoat before I went on. After the first decals were applied, I thought, maybe this time I could do it without.

A bad mistake, as you can see on the pictures, the decals began silvering. This could be solved with a thin brush and some color, as I did on this IS2, there are no traces left of the silvering decals on the turret.
But then the real shit happened. I read somewhere in the net, that Revell Aquacolor colors can be mixed with ethanol for the best results. I mixed up some matte clear coat and made a testpiece, everything seemed alright.
When I started to seal the models I did not see what would happen next. I had to hurry because I had to work that evening. One layer here, one layer there and soon all kits were finished and stashed aside to let them dry completely.

As result, the clear matte coat got milky, very milky. I think it was because of the ethanol. A very annoying result, it would be no problem to repaint the tanks, but the decals are gone.
The next time I will show them, they will have a proper paintjob.
October 14, 2017
Italeri 1:72
Winter Soviet Infantry
And Other Minis
Winter Soviet Infantry
And Other Minis
I wanted to continue this blog after more than 7 years and while I was preparing a new post, I found this unposted draft from the past.
This assortment of Soviet ww2 infantry is from Italeri but I see at least one mini from another manufacturer. I think these figures and many more are somewhere hidden in a box.
See some new stuff in the coming post.


Zvezda 1:72
"Art of Tactics"
Soviet 122mm Howitzer
"Art of Tactics"
Soviet 122mm Howitzer
I wanted to continue this blog after more than 7 years and while I was preparing a new post, I found this unposted draft from the past.
The gun and it's crew and the infantry troops come from Zvezda's "Art of tactics" and went well together (as far I remember). I think there are more built and painted Zvezda guns and mini somewhere in my old stuff .


February 14, 2011
Italeri 1:72
Soviet ZIS-3 Gun
And Anti Tank Team
Soviet ZIS-3 Gun
And Anti Tank Team
Pictures of the Soviet ZIS 3 antitank gun and crew from Italeri (#6097). It's a nice kit without flash and with only minimal mould lines.
The figures were painted in the usual Soviet scheme, the only additions of colors were GW Snakebite leather (#61-64) and Revell Aquacolor beige (#36314) for the winter hats, and Revell Aquacolor Dark Earth (#36182) and GW Devlan Mud wash (#68-25) for the greatcoat. The gun was painted with Revell Aquacolor Seagreen (#) followed by a wash with GW Thraka Green (68-21), them I did a light drybrush with a light grey.
All figures and the ammo box are based on 1 cent coins.

The only negative point of this kit is that the barrel can't be moved up and down, becaus the ZIS 3 gun was not only used for fighting tanks, it was used as normal field artillery too.
Lots of informations and pictures about Soviet field artillery can be found in the Waffenarsenal journal about the Soviet field artillery (ISBN 3-7909-0540-2) that can be found for a low price at Amozon.

And a view on the Italeri antitank team (#6131). All figures were painted my usual Soviet scheme, that can be found on this blog. Additional colors for hats and greatcoats can be found above.
The machine gunner got his cape painted in a snow camo style, I think that fits very good in a Winter setting. All these minis are based on 1 or 2 cent coins.


Great figures by Italeri, these figures mix very well with the Soviet Winter Soviets (#6069).
February 13, 2011
Orion 1:72 Anti Air
Quad Maxim And DSHK
Quad Maxim And DSHK
Here are some pictures of the new Soviet figure sets by Orion, "Soviet Quad Maxim AA MG and Crew" (#72037) and "Soviet DShK AA MG and Crew" (#72038).
First the Maxim Quad, it can be used well for early war scenarios, the figures wear their field hats and are armed with rifles, the equipment of them is mostly light.
All figures are out of the box, the only modification was to base the lieing rifleman, he got a new base and is now shooting straight. The figures are painted in my usual Soviet color style, the colors I used can be found in this post.
The gun itself was a tough build, I can't remember that I ever used more glue on a gun than on this, and my personal carpet monster got a new sacrifice, that's why the gunsight is missing.


The DshK kit is more a late war set, all figures wear helmets and the gunners are equipped with the PPSh machine gun which depicted in the later war.
These figures were painted in my Soviet scheme, too.
The machine gun was build without any problems.


One of these two kits had a lot of flash and mould lines, but I can't remember which of them, but it made no fun to build the quad Maxim.
Update:
Booth sets contain 3 identical sprues each with 5 different figures and one gun. Pictures of the unpainted sets and sprues can be found on Plastic Soldier Review.
October 26, 2010
Hong Kong
Airfix Afrikakorps Clones
With Helmets
Airfix Afrikakorps Clones
With Helmets
Today I received a figure lot from the bay and it included a great surprise. Among many other figures it contained about 100 of Hong Kong clone figures of the good old Airfix Afrikakorps set. But these check out the picture below.

The pictures shows on the upper row some figures from the Airfix Afrikakorps set, the lower figures are their clones. Both look equal except for their headgear. The detail of the clones is not too bad, the details could be better, but these are cheap toys, the scale is like their origin's, more 1:76 then 1:72.
I've never seen these (clone) versions of the Airfix AK before, even when I played as a kid with toy soldiers in this scale and I had hundreds of them including AK clones. But mine weared all fieldhats.
Update:
A reader left a comment, that these minis are copies from the old ESCI hardplastic set of the Africakorps, and it seems that he is right. Check out this link to Plastic Soldier Review.
Update:
A reader left a comment, that these minis are copies from the old ESCI hardplastic set of the Africakorps, and it seems that he is right. Check out this link to Plastic Soldier Review.
October 23, 2010
New Zvezda WW2
Soviet Figures
Soviet Figures
I found this post in the Tiny soldiers forum. The linked pictures show the Maxim machine gun with crew, the other announced sets are listed too.
The Russian producer Zvezda brings out a new series of Soviet and German soldier figures and equipment of the second world war in 1:72. As I read it from the post, they will bring out their own rule system for them. They started with the T34/76 some months ago, and today I found first pictures of the upcoming figure sets.
Seems like they are available soon, CW toys has listed them but they are still not deliverable.
I always wanted to keep any advertising out of this blog but sometimes
there are some shops worth to be mentioned. I do not receive any bonus
for this.
Update:
Paul left a link to more pictures in the comments. And I found some pictures and informations at the Henk of Holland site (here). There are also some more informations on the Zvezda homepage (in Russion but Google translations worked fine).
Update 04/2018
CW toys has closed it's gates.
October 21, 2010
Armourfast 1:72
Sd.Kfz. 251/1
Part 4
Sd.Kfz. 251/1
Part 4
I continued the work on my Armourfast 251's. I wanted to paint them in a generic 3 color camouflage with hard edges. For that I started to mask with tape, but the tape I use was/is not good for this. I made a visit to a local hobby store and bought some masking liquid, the shop owner told me that thau would work.
I painted the whole model in Aquacolor sand (#36116) after that I made spots with the masking liquid to the place that I wanted to keep sand colored.

After that the models got a layer of Revell Aquacolor fern green (#36360). Then I applied the next layer of masking liqid to mark the areas that I wanted to keep green.

The next layer of color was Aquacolor mud brown (#36180), I used it even when it is glossy, I learned some day ago that it won't shine anymore after the last layer of sealing matte paint.
After all the color was dry all I had to do was to remove the masking liquid to see if it worked as I planned. Watch the picture, it worked fine. It was tricky to remove all of the masking liquid (very sticky stuff), but when I was almost finished with it, I found out, that an old toothbrush was a good tool to remove the stuff.
I think this technique will work with normal brushes too, you do not have to own airbrush to use it. And the rmoval of the masking liquid (after it and the colors dried) could be easier if only one thin coat of it is used, as you can see on the first picture I took someting more then was needed.
But it worked :D

On the right 251 I took the antenna apart, it will be fitted later. The funker workplace was improvised without any sources and was scratchbuilt.
I'm not sure what to do with the two 251s, but I tought about a new idea to apply wash. If I use now a good shiny clear color to seal it, a wash would only flow in the hollow (?) spots of the kit. I will use this method on an old toytank for a first try, if it works, that is something I will try before. You will read it here in this blog, but before that I have to finish some older projects.
I'm not sure what to do with the two 251s, but I tought about a new idea to apply wash. If I use now a good shiny clear color to seal it, a wash would only flow in the hollow (?) spots of the kit. I will use this method on an old toytank for a first try, if it works, that is something I will try before. You will read it here in this blog, but before that I have to finish some older projects.
The two Armourfast 251 will go now into the "actual projects" box, they will be finished someday because I found some days ago some pictures of an other model of which I own a kit, and these were a great inspiration for me so, but more infos soon, the topic will be Panzer46.
And then I will take some time on my 28mm undead army, I hope tomorrow my new Mantic zombies will arrive,it's time to kick some dwarfs' asses.
October 20, 2010
Armourfast 1:72
Sd.Kfz. 251/1
Part 3
Sd.Kfz. 251/1
Part 3
I finished the construction of my Sd.Kfz. 251s. The fenders are a little too low, the wheels fit very closely, luckily I lost one of the wheels therefore I use the wheels of the ESCI 251 which are a bit smaller.
On the following picture is a comparison of the Armourfast, Revell and ESCI frontwheels.

One of them got the pioneer bridge of the ESCI 251 kit, and when I'm at it I will loot another ESCI 251 kit so the other 251 will get a frame antenna. I hope I can attach it without too big spots of glue.
Some tools and other stuff will follow, I have to search my spareparts box for pieces to attach.

Both Armourfast Sd.Kfz. 251 got their base color, is this case I use Revell Aquacolor sand (#36116). I will try to paint them in 3 color hard edged camo pattern, eventually I will do this tonight at least I will try to mask them tonight. Then I have to find some decals for them.
October 19, 2010
Italeri 1:72
SdKfz. 234/4
SdKfz. 234/4

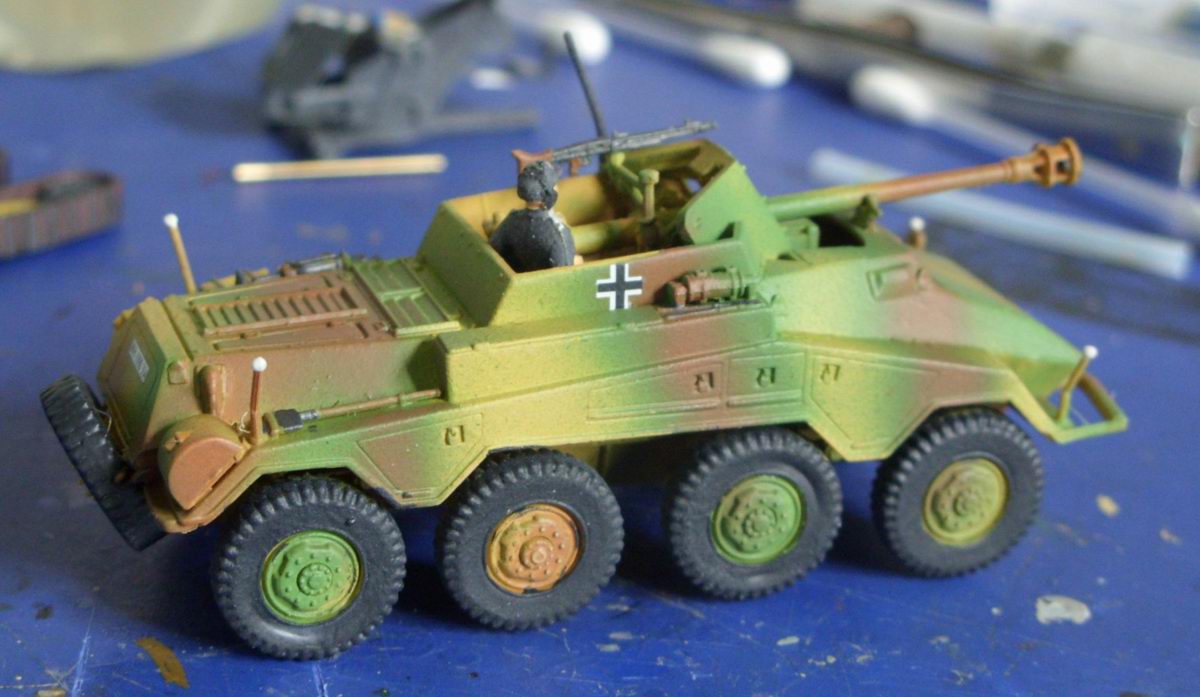

Pictures of my finished SdKfz. 234/4. The figure came with an Italeri kit and doesn't have legs because it was commander of another tank before wher he did not fit with legs.
This kit was build some months ago, I remember that all parts fitted very well. The construction went without problems, but on the next kit I will not glue the wheels before I paint it, this will make it easier to paint.
And I learned something new. I accidently bought glossy mud brown that I used for the camo pattern, but I recognized it after I applied it. That's why the brown in the previous post so shiny, I thought for alsmost 3 hours that the color was still wet.
But after the last layer of matte paint the brown spots weren't shiny anymore. Great, I didn't knew that before, I tought I had to repaint all brown with matte paint.
October 17, 2010
Italeri 1:72
SdKfz. 234/4
(Work In Progress)
SdKfz. 234/4
(Work In Progress)


Some pictures of an actual project, this is Italeri's SdKfz. 234/4. This is the first kit that I painted with a "real" airbrush gun, the colors are still a little wet. The used colors were Revell Aquacolor Sand (#36116), farn green (#36360) and mud brown(#36180), all colors were thinned with alcohol.
The camo pattern is not too bad for a first try and there are some spots where I will use a brush to finish the paintjob.
The picture below shows my new airbrush gun and compressor, I bought the Revell Airbrush starter set (#39199) and I think it is worth its price.
Next week I will publish my videoreview of this stuff, the scenes are already filmed but the sound is too bad, that's why I have to re-record it.

October 15, 2010
ESCI 1:72
Victorian Infantry
Victorian Infantry

British infantry of the Victorean era. These figures are from the ESCI set "British Infantry Soldiers" (# 212). Painted with Revell Aquacolor and Citadel acrylics. In my opinion the belts still look too clean, but I will try a wash or maybe some grey.
October 8, 2010
Pobeda 1:72
Dead Soviet Infantry
Dead Soviet Infantry

The figure above is from the Pobeda Set "Die in Stalingrad" (#72-101) which contains some resin figures and a vac-formed base.
The stretcher is made of steelwire and aluminium foil.
The stretcher is made of steelwire and aluminium foil.

This pile of bodies comes from the same Pobeda kit. I think this is one of the strangest figures in my collection.
Booth Pobeda figures needed a lot of sanding, on the pile of dead I used some putty to fix the worst airbubble holes.

Hmmm, no comment. The figure is the dead one from the Pegasus Summer Soviets, the ladder comes from Airfix. The rest was built from scratch.
LW/Evolution 1:72
Soviet Artillery Crew
Soviet Artillery Crew

Soviet artillery crew by Russian (?) producer LW but also produced by Evolution. Sealed in a ziplock bag with a photocopied paper that contains the "box art". The bag contains 2 sprues, each with 7 crewmen and some boxes and shells.
As you can see, this figures were not sculpted by LW/Evo. They are only modified figures of the ESCI set "Soviet Infantry", but the modification was well done.


The figures were based on 1cent coins, panted with my standard Soviet color scheme and will serve on the 122mm or the 152 howitzer, I have the PST kit 72030 and you can build each of them.
Subscribe to:
Posts (Atom)


