September 28, 2019

Model Storage

At last I found a way to store at least my 15mm models properly. Some days ago I was at a local discouter and found these boxes. I took the opportunity to get some of them for my minis, these things cost 1,99 € what is ok, and, what is important, in these boxes the models should be protected from (my eternal enemy) dust.

From a friend, who is musician, I got some accustic foam, he did not need this stuff anymore but I can use it for the bottom of the boxes to secure the models as you can see on the pictures above.
There was enough for the (first?) 10 boxes, if I would need some more of this stuff I could get it from him.

Each army got its own box plus two boxes for all planes and helis, on the picture above you can see my cold war US tanks (and a batch of Heinlein books), but since I ordered another dozen of Zvezda "Art Of Tactic" expansions (the whole range will get a closer look in the future), I may need additional boxes, some of them are already full.
At the moment the helis are stored sub-optimal, I wanted to glue some coins or stuff like this to the cover of the box, to attach the magnetized rotors on them, but most of the glues I already tested did not stick. And I should get a separate box for all heli and plane bases.
But all in all I am happy with this solution, and while I sorted my models to the new boxes, I noticed that I have a lot 15mm models, more than we will ever use for games, but I like these small things, and I will add more 1:100 models to my collection.

While I had a flue last week, I was not in the mood for any modelling or blogging, but last Thursday I was fit enough for another roguish Montagsmaler meeting. My mate Olli finished his Tiger 2 and started to paint another tank, while I painted several tank crews and some of the kits which I still want to review, luckily I made all pictures which are needed for this before I started to build them.

This weekend is dedicated to modelling. At the moment I have one half of Ollis 15mm Bundeswehr platoon on my bench, these kitten got an additonal layer of matte varnish and he left them here to dry. The new Vallejo matte varnish I use is great, works fine with the airbrush and the paintbrush

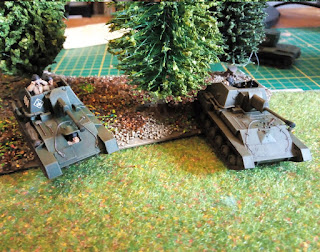
Just a random Montagsmaler picture:

At the moment I am planning what I will post the next days, I think it will be the Zvezda Sd.Kfz. 186, Ollis Bundeswehr models, both Italian expansions for "TANKS", and some ww2 pictures. I still have 4 "TANKS The Modern Age" expansions laying on my desk which I want to (mini)review, but one thing at a time.
Too bad, I already built one of them without taking pictures of the sprues. But I will improvise when it is time for the closer look at that kit. Not to forget to mention all the new custom unit cards I made in the past few days.

I just came home from work but now it is weekend and you can expect another post tonight, then I will take a closer look at the Sd.Kfz. 186 for Zvezdas "Art Of Tactic" wargame, I only need to take a picture of the finished kit and write some lines, the rest of the post is almost finished.

September 18, 2019

Zvezdas SU-76
Versus The
Plastic Soldier Companys SU-76

After we took a closer look at the Zvezda SU-76 and the Plastic Soldier Company SU-76 in previous posts, in this post I will compare both kits. I am no professional but this should be no hindrance for a simple comparison of these two models.
Both kits were primed with AK Interactive Russian primer on most pictures.

A frontal view on both tanks. The PCS tank looks wider but they have the same width. Both tanks have some tools and a steelrope moulded onto the hull, what can be seen better on the picture below. But at an overall level, the Zvezda kit seems finer. A plus for the PSC kit is the option to build the drivers hatch openend.

You can see that the Zvezda model is a little longer than the PSC SU-76. While the front part of both tanks roughly measures the same, the Zvezda kit is a bit longer since its crew compartment is bigger.

A look at the rear shows that the PSC model seems higher than the other tank, but this is not the case, I choosed a bad angle for this picture. While the general grade of detail is ok on both tanks, I prefer the kit on the left side.
On the PSC tank I lost the box part at the right side and replaced it with a tarp from the bitsbox.

 
Both models from both sides. You can see some differences on these models, but the overall look is pretty equal. The exhaust pipes of the Zvezda kits are finer, also this kit has a spotlight, what is missing on the PSC kit.

A look into the crew compartment of the Zvezda model. The amount of details is pretty nice, you can see some munition racks and the gun is made pretty fine including a gunsight. The crew compartment is much deeper as on the PSC kit, on the first picture of the post you can see, that the crewfigure is hard too see, since it is almost at floor level.

A look into the crew compartment of the Plastic Soldier Company model. The inner details are given but simplified and the gun is pretty basic with a low grade of detail. But for a wargaming model, this is still fine.

If I would have to build a SU-76 platoon, I think that I would take the Zvezda kit, and no, I did not get paid by them to write this. Its amount of details is higher than on the Plastic Soldier Company model. This does not mean, that the PSC model is a bad kit, it is a nice model for wargamers, but on a personal view, the Zvezda kit is the kit which I prefer. A quick pricecheck showed, that a 5 model box of PSC SU-76 is almost priced equal to 5 single Zvezda SU-76 kits.

But at the end it is your decisision which models you would use for any games. But I hope, that this post may be helpful.

By the way, finally I found out how to change the name of my Youtube channel, and I replaced the retarded former name with the name of this blog and added a nice header image.

1:100 BM-13 Katyusha

Some pictures of my recently finished 1:100 BM-13 Katyusha rocket launcher from Zvezdas "Art Of Tactic" wargame range. I had built that kit before and used it as a base for this built. Some time ago I ordered it once again and made some simple modifications to improve its look.

First of all, for the windshield I built a simple armourplate from scrap plastic. Even when the armourplate is on the boxart of this expansion kit, it is not included in the actual modelkit as we saw in the closer look at the kit in the past.

I searched through my bitbox for the leftover rocketspart from the first BM-13 that I built. Since the Zvezda BM-13 has only an upper row of rockets, it was good to keep this bit for the bottom part of the second rocket launcher. Then I separated all rockets from each other and glued the single pieces to the rail.

The last thing I did was to add support stands for the rear of the truck. They were built from scratch using some scrap plastic. While they are pretty basic, they improve the look of the BM-13 a lot, just as the other two modifications do.

But no further words, let the result speak for itself:


Tomorrow I will compare Zvezdas 15mm SU-76 to the Plastic Soldier Company 15mm SU-76, and we will see, which of them I would recommend for platoonbuilding.

I am still unsure, what to post after that. Both Italian expansions for "TANKS" are on my desk, just as the Humvee expansion for the ww3 version of the game, there are still some unfinished "Art Of Tactic" reviews, and somehow keeps the list of custom units to make still growing and growing.

We will see. You can see the next custom "TANKS" unit on the picture below. When the KV-2 cards are uploaded, this beast is next.

September 17, 2019

More Aces Of
The Autobahn


Just saw this car on my way to work and wanted to share these two pictures with you. First I tought, nice, the driver had a P-40 Warhawk as model, but with those black U.S. emblems, this should be post-ww2. Maybe the sharkmouth design was taken from the Cobra Helicopter or the A-10, many pictures of them with a painted mouth can be found on the web.

A funny coincidence since I made a picture of this some weeks ago.

At the moment I am finishing the BM-13 post, it will go online in some minutes.
Done.

September 16, 2019

15mm Planecrash
Scenery Pieces

After the Soviet forces crossed the inner German border, big parts of Germany were conquered and sucessfully defended by them, while their allied Warsaw Pact forces rushed forward to reach the French border.

It is still unclear, what happened to F-WTMD. NATO and Warsaw Pact accuse each other. An small East German unit was near while the crash happened and reached the crashsite first.

It seems the Eastern forces concentrate in the Rheinland, ready to attack France. Then it is time to get these into service to defend their homeland.


You may know this kit from a previous post, it is the Master Modell 1:100 Dassault "Mercure" which got a closer look in this post. Pictures of the built modelkit can be found in this post.

This was built in a typical manner, some sand, paints and flock, and voila, it was done. Of course, this did not went fast, I spent the whole Sunday on these pieces. Two pieces were already started and two more were built from scratch.

But I wanted something more. I had some flickering LEDs and wanted to install them into some of the wreck pieces. I improvised the LED holders using some metal and LEGO parts and much glue and brought them into place with my trusty hotglue gun.
These things look creepy but they do their job well.

The the rear "smokepiece" is removable to reach and change the battery of this thing. LEGO pieces are used as connectors and this works well. Also a switch was added.

When everything was in place, I added some "smoke" using cotton. This made a little mess, but in the end it works as supposed. Then I gave the cotton pieces a fat layer of clear varnish to add some strenght to the cotton followed by some black to darken the smoke.

How this thing looks now, when it is finished, can be seen in the video below:


Originally I planned to post yesterday, but I was in the mood to continue the work on these pieces and to prepare them for today. I hope I will be able to finish and upload the BM-13 and Katyusha posts tomorrow, since they are roughly finished it will not take too much time.

Todays roguish Montagmaler session was nice. While my mate Olli gave one of his tanks a fine paintjob, he painted a very nice German camouflage pattern, I built the electonics for these scenery pieces.
Even when I was sceptical while I worked on them yesterday, the result has a pleasing appeal, and I can not wait to see them on the battlefield.