June 13, 2018

Rügen'46:
Stoppt die Eindringlinge !!


Another Rügen'46 post? 

This time it is Reaper Bones' Sister Maria and a companion.
Since not only the remains of world's governments strife through the ruins of the devastated city of Sassnitz, the forces of the Vatican may be seen in various raiding parties.

The mini got painted in a very simple way, I even did not use white on the collar, it is still the color of the material. The main color is black with no shadings or highlighting. Depending on the source and angle of light, I like the look of natural shading on this figure.

Next is Indiana Jones' unemployed cousin from the South a.k.a. Frank Buck. Adventurers from all over the world are joining the opposing forces for great reward, just as this guy, but are they trustworthy?
He was painted in various beige and brown tones followed by a Army Painter soft tone wash. Then I painted the hat and the face/hair.

The nun and the adventure rare made by Reaper miniatures who offers with it's Bones sortiment a big range of miniatures for a low prices. The reason for this is, that the miniatures are made from some kind of PVC. They are pretty soft and the details are very soft. 

I hope the paint will stay on these figures since they will be in heavy use in some weeks. I am concerned about the soft material, some paint may split off.


One miniature from the British Snipers set of Warlord Games' Bolt Action range. Human ressources got rare since the incident, highly trained marksmen from overseas can be seen in any of the conflicting groups which are the remaining since the collapse of the civilisation.

I like the look of his ghillie suit, and the paintjob of it went pretty uncomplicated. I used green as basecoat, then I used two more green tones to paint some of the patches of the suit. After that I only added a wash with Army Painter soft tone before I went on the rest of the figure.

Last but not least a picture of two minis from a previous post. I planned to rearm them and since I got the excellent weapon sprue from the Warlord Games Siberian veterans, I got some matching handguns.
The female miniature got a new revolver and the male figure got a complete new hand with gun. I cut away the old parts and glued the new arnament to the mini.

Since I am pretty wasted at the moment, since Mr. Burnz got his birthday today. I am happy that I made this post some days ago, don't think this would work well at the moment. There is still one more post (almost) ready, which will be online tomorrow, but in the meantime I made some more weird stuff, enough material for some future posts.

If there are heavier mistakes in ma bad English than usual, please excuse this rare circumstance I will fix it as soon as possible. But now in this moment.

June 11, 2018

Rügen'46:
Механизированная
пехота обезьян
(and some 3D printed stuff)

Since the Rügen Incident, things went bad in Europe. Findings from various artefacts did not solve the question what happened on the island and it is still unclear what hides beneath the ruins of Sassnitz.

But what was found pushed scientific progress beyond known borders....

Mechanised Ape Infantry (M.A.I.) which is one of the results from cruel experiments in the bunkers of Stalingrad, also known as "Ape-X" from Reaper Miniatures' Bones range.
Reaper offers with it's Bones sortiment a big range of miniatures for a low prices. The reason for this is, that the miniatures are made from some kind of PVC. The material is pretty soft and the details are soft.

On both minis I modified one arm. I cut and reposed the arm, then the resulting gap was filled with Greenstuff, in which I sculpted a fur pattern with my hobbyknife (called cuttermesser only by professionals). If I would not know, I could not say which arms were changed.
Also both miniatures got a new 3D printed 50mm roundbase, since I did not like the look of the bases attached to them. The bases were printed with the same setting than the stuff below, and took 50 minutes to print for each of them.

I finished the miniatures with a simple but effective paintjob. When these creatures will be used for future games they will count as light tanks.

While I painted the miniatures, the 3D printer printed some movement trays from Thingiverse. They will be a nice addition for games or maybe even figure storage.

By the way, I think I never mentioned that we are using PLA as printing material.


The movement trays were printed with 100% infill at 195 degree celsius, with a print and movement speed of 50mm/sec. Printing one of these things took about an hour, after that I added some sand and my standard base colorset to make them match with the bases of the minis on it.


And as you can see, the new movement trays look decent and match perfect with the bases.

June 10, 2018

15mm German
Tankhunters

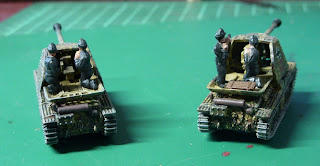
A bunch of 15mm German vehicles I finished. All were painted in the Hinterhalt camouflage pattern which I use for all of my German tanks.


This is my Sd.Kfz.234/4 from Battlefront miniatures, some years ago I built one of these in 1:72.
I bought the TANKS version of this model which offers four different options to build. If you want to use it for TANKS, you get two different tanks you can use ingame, but you have to decide which version you want to build.

I built the Sd.Kfz.234/4 from this kit. Seeing the stats of this unit it may be an good option to use.  After some Google search I found out that it is not too complicated to build this kit that you can use all four possible versions, but I decided not to do this.

Instead, I turned on the 3D printer and made myself a Puma wheeled tank. Since I did not want to post about 3D printing this time, there is no picture of it

Seeing all the bits that are left over, maybe it is time for some more creative bits recycling like I have done before.


Three Sd.Kfz. 139s, built from bits from the Plastic Soldier Company Marder III kit and 3D printed hulls. Some lines about the construction can be found in this post. If you compare #1 and 2 and the number 3, you will see, that I used different settings on the 3D printer.

Some minor parts like the exhausts and the storage boxes of the number one and two had to be built from scratch, but after the paintjob they look great from a certain distance, but in close look you see the messed up details.


Two Marder III from the Plastic Soldier Company Marder III kit. I had to choose which tank to build from this kit because it offers three different tanks to build from.
I built the Marder III from this kit, I like it's shape. And I am pleased with the results. Both tanks have a different finish, even when I used the same paint, maybe it comes from the fact that I sealed one by hand while I sealed the newer one with the airbrush. And maybe it got a little too much matte paint

Today I started to rework some ruined buildings from Amera Plastic Mouldings. This will be much to do, but using my airbrush saves a lot of time.

June 9, 2018

Rügen'46:
Нападающие,
готовые к атаке

Last weekend I spent some time to rework the Plastic Soldier Company Russian infantry I painted a while ago. Even when I was happy with them when the were finished, in the moment I saw the Westwind Production SHS heads, see this post, I knew what would be to do with them.

I messed up the pictures.
 there are six figures missing and 
six figures two times on the pictures above

Heads were rolling like at the French Revolution. After all minis were headless, I drilled holes for the new heads, which were glued with UHU Hart. This fine stuff needs some time to dry but after it is dried there is a strong connection.
The modifications went without big complications, the most heads were easy to remove, some poses needed more efford, because of some hands and guns attached to the helmets.
I wanted to save some time, that is why the minis in firing poses look a little weird. But I did not want to repaint the whole mini, what I would have to do if I had to pose the gasmask filter a little more appropriate.

The paintjob was fairly simple. The mask, tube, and filter were painted with Revell Aquacolor. Then I made two black dots for the eyes, followed by a lighly thinned black wash. The helmet was painted before I sealed the new head.
Luckily there was almost no damage to the paint at the necks where I removed the heads. I used AK Russian primer for the new heads, that color concealed all messed up spots arround the necks.

Finally I found a use for my (weird) ww2 styled miniatures, and are only four weeks to go before these guys will roam through the streets of Sassnitz. But before they can do this, there is a lot of work to do.
Tomorrow is Sunday what means: turn off the mobile, ignore the doorbell, time for some models to build or paint. This time I have a clear goal, I have some built Amera Plastic Mouldings ruins in the basement that will get a new look.

Komm, wir gehen
nach Panama

Yesterday the Montagsmaler went rogue and met, even when it was Friday. My mate continued the paintjob on his German tanks, last week we removed the old paint, basecoated them, and gave them a first layer of paint.
While Olli removed the masking tape from his Tiger, the tank's paintjob looks somehow like the Tigerente from German children's book author Janosch.

At the moment I am preparing a handful of post for the next days, a lot of stuff piled up in the past few days that a I would like to show you.