I found some pictures while I made a backup from my old mobilephone. This is a
Hawker Tempest I built last year, also thesetwo were built at the same time. The built went pretty fast with no
complications even when there was much flash to remove since the moulds
for this kit are old and kind of worn out.
The Me 262 was built and painted by my mate Olli, while both bases were made by me.
I heard that the Revell Micro Wings kits will not be published again, what would be a shame. These kits were some of the first modelkits I ever built, more than 30 years ago.
This is just a quick post, I am preparing some lines about the helicopters I use for "TANKS The Modern Age", that post should go online soon. After that I am doing some maintenance on the labels of this blog.
A closer look at the BMP-1 / BMP-2 tank expansion for "TANKS The Modern Age" from Galeforce 9. This game offers a ww3 scenario, if you own the matching cards you could use your models from "Team Yankee" for this game.
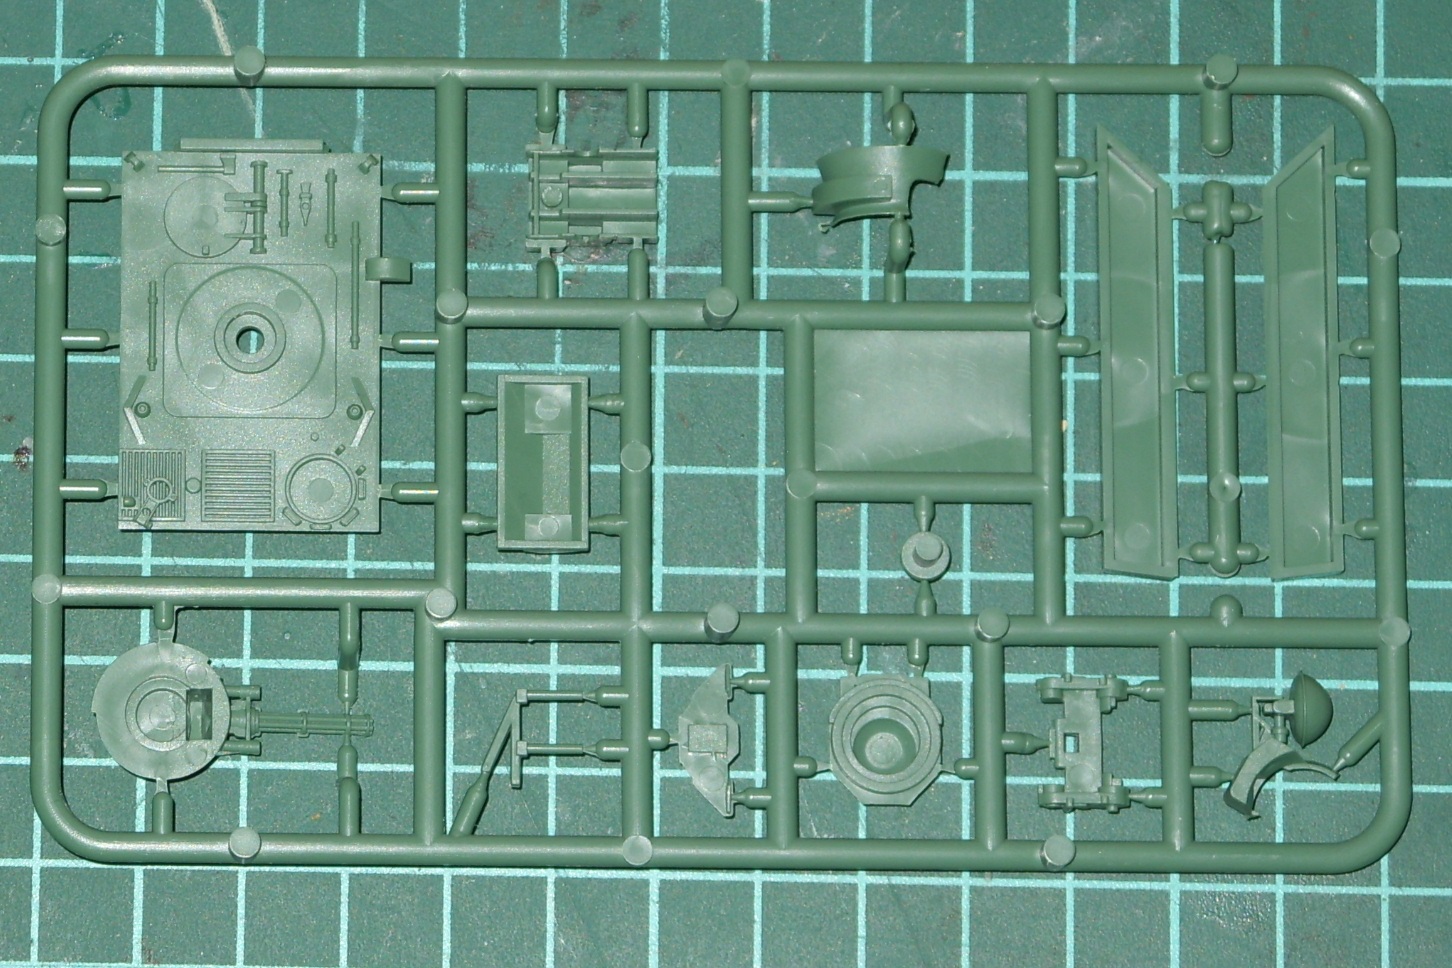
Just like all other expansions for the game, this box contains an 1:100 kit and some cards for "TANKS The Modern Age". First a look at the kit which is included.
I do not want to repeat myself but once again this is a kit without any
flaws. There are virtually no mouldlines and any possible ejectormarks
will not be seen when this kit is built. As you may have foreseen it, there are no sinkholes or any flash.
The building instructions are kept simple but easy to understand. Depending on which version you want to build, a complete upper structure with matching turret will wander in the bitsbox (more on that later).
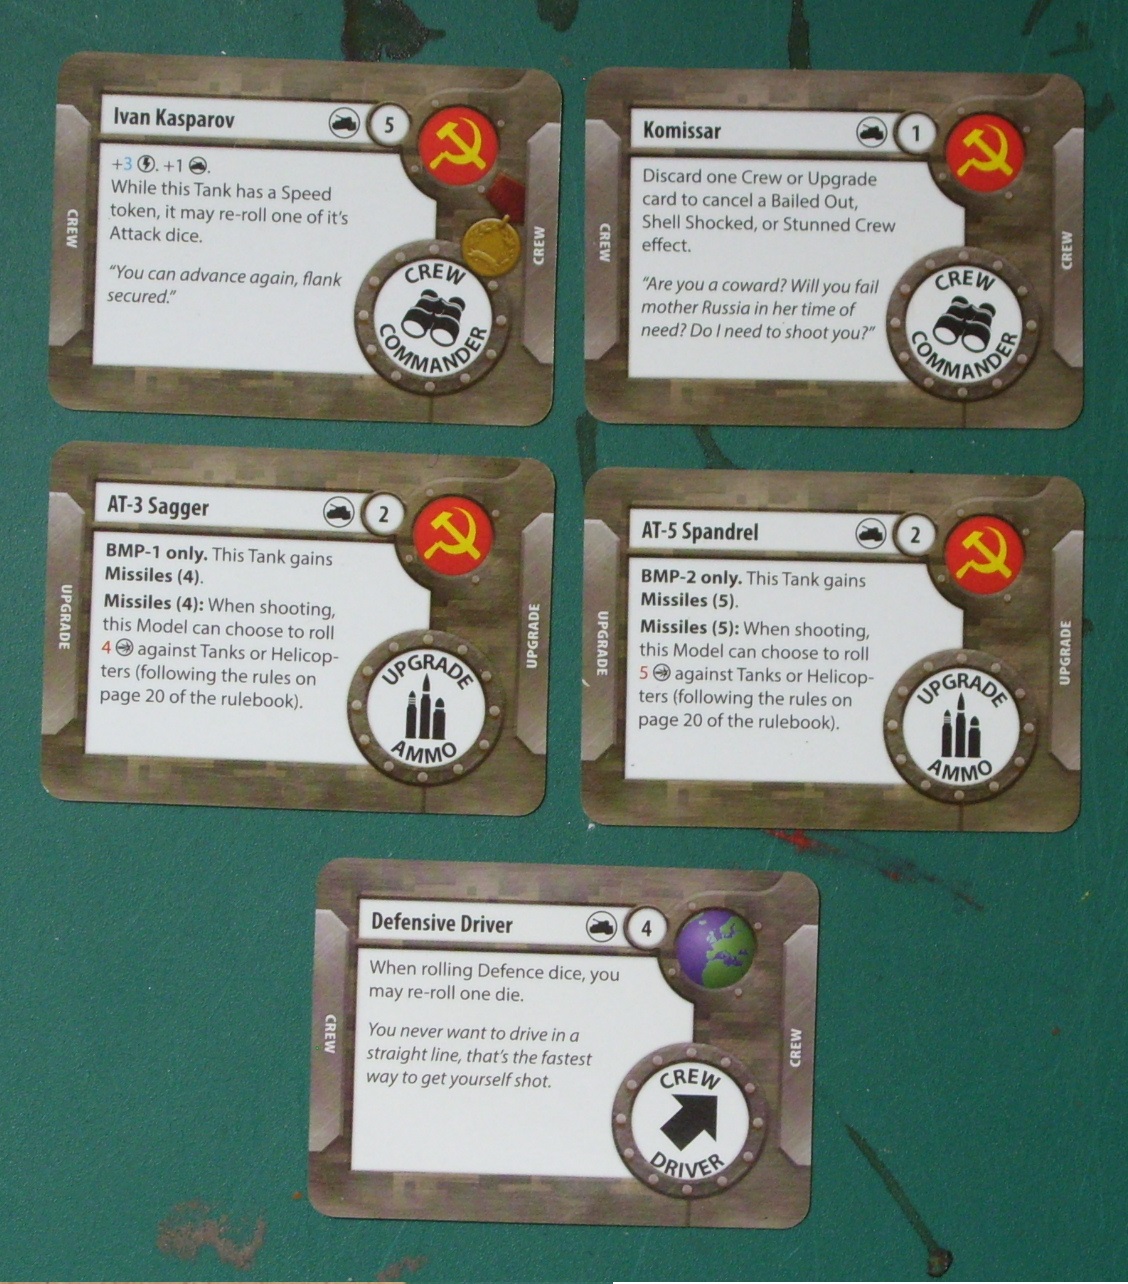
After a look at the plastic let us check out the cards. First we have the cards for the units:
The BMP 1 offers a low Attack of 3, with an Initiative of 5 it is "slower" than the BMP 2 which has an Initiative of 7. The scout ability is useful because the unit has no armour and only 3 hitpoints. Equipped with the AT-3 this unit costs only 12 points.
The BMP 2 has with its Rapid Fire ability 5 dice against unarmoured vehicles and helicopters, and if it is equipped with AT-5 missiles it is a threat to any unit on the battlefield. But this arnament is needed since its base attack is only 2. For 15 points (including the AT-5) you get a nice allrounder which is pretty fragile with only 3 hitpoints and 0 armour.
Next are the crewcards, 2 Soviet and an additional crewmember are included. The Soviet hero unit "Ivan Kasparov" offers some nice advantages for only 5 points. You will not only get an Initiative boost of 3, you get an extra hitpoint. Also you get the possibility to reroll an attack dice if you have a speed token. This comrade is not only useful in a BMP.
The Soviet "Komissar" offers the choice to drop an equipment or crew card if you draw some special critical hits. For the cost of two points this may be an interesting choice.
The "Defensive Driver", usable for all nations, offers for 4 points the chance to reroll one attack dice each time you attack.
Last but not least there are 2 equipment cars included. Each BMP gets its additional missile launcher for 2 points. This seems like a must have.
At the moment this are the only Soviet anti air units, that why they are very important if the enemy uses air units, especially since Soviet intelligence reported that a Bundeswehr platoon with air support has been detected.
Once again I recycledthebits which were left over after I built the BMP 2 from this kit. I found this template at Thingiverse and first I printed the hull. I had to use some sandpaper to make it fit.
See the 3D printed part below, printed at 195 C with 100% infill and 40mm printing and movement speed in 0.1 mm layers. It took about 2 hours to finish.
But the 3D printed tracks went pretty bad, after 3 successless attempts, I decided to use another method to get a pair of tracks for the BMP 1 hull,which I choosed to recycle. In this post you will find a video how I made the tracks for the tank.
And the result looks ok, see for yourself. With a layer of paint it probably will look better.
Maybe tonight I will give you a look at the Revell 1:100 helicopter kits I finished for the game.
By the way I have to correct myself, I thought that the "Team Yankee"/"TANKS The Modern Age" helicopter units are 1:144 scale. But I was absolutely wrong. Only the planes are made in this scale.
A comparison of the Battlefront and the Revell Hind and Cobra kits shows that the BF kit comes in 1:100 scale, just as the BF Cobra.
But you may see for yourself in the next weeks when I will take a closer look at the Battlefront and Revell Hind kits and the Battlefront Cobra kit, which has ridiculous large panel lines.
A closer look at the M163 VADS / M901 ITV tank expansion for "TANKS The Modern Age" from Galeforce 9. This game is a followup to TANKS, and, as I would call it, a spin-off of Team Yankee. It contains a 1:100 model kit and some cards for the game.
First let us take a look at the plastic:
This kit comes in three sprues. The first two pictured are from the
M113 box, the third sprue contains all parts needed for the M163/M901.
Just as the other TANKS kits in my collection, the kit came without any flaws.
All three sprues have neither sinkholes nor flash, any visible ejectormarks will
not be seen when it is built, and there are almost no mouldlines.
On
the first picture of the second sprue I marked the parts needed, even
when you manage to build both versions from this expansion, I did it
in this post, there are a lot of bits left over, the M40(?) recoilless gun would fit perfectly on a Toyota offroad truck.
After a look at the plastic, now it is getting interesting, a look at the
cards which were included in this expansion for "TANKS The Modern Age".
First there are the two unit cards:
The M163 VADS (Vulcan Air
Defense System) is a heavy hitter against unarmoured vehicles and helicopters,
its Rapid Fire ability grants 7 dice against them. And an Initiative of
7 is also pretty good. The Scout ability is needed because this thing
has only 3 hitpoints with an armour of 0.
The M901 ITV (Improved TOW Vehicle) is armed with a 4 dice missile attack, useful
against all other units on the battlefield, and the Hammerhead ability
triples the armour given by cover, but this is needed because this unit
has only 3 hitpoints and no armour.
This expansion comes with 3 crew- and 2 equipment cards. This time you can use the cards for all nations except for the heroic crewmember, "Clarence Tucker", which is a nice addition, for 5 points you will get an additional attack dice (*), and when you reveal the card you will get plus 6 Initiative for that round.
(* hmm, feel free to correct me, but I think this would not work with Rapid Fire and Missiles, and then there is only the Initiative boost left. Is this worth the five point cost?)
The other two crewmembers are the "Daring Driver" and the "Superb Commander", who are pretty nice crew members which are worth their low cost, additional Initiative or a defense dice reroll is always welcome.
"Camouflage Netting" offers additional armour when stationary, while "Ambush" gives +4 Initative in the shooting phase when you discard it, both cards are ok for its cost of 2 points.
The last picture in the previous post show the M163 VADS built and painted and what I did to build both possible versions of this expansion from this box.
The next post should be a closer look at the BMP expansion for "TANKS The Modern Age" and some small words on the recycling of the leftover BMP bits.
By the way, I found a small batch of pictures which will be added to some older posts, but this get a separate post.
In my next post I am going to take a closer look at the M163/M901 tank expansion for "TANKS The Modern Age". But in this posting I will jump directly to the recycling of the leftover bits.
Instead of the 3D printer this time some stuff called "Oyumaru Instant Mold", repacked by pk-pro, was used.
If you are not familar with this thermoplastic stuff, you can watch this video to see how to use it. The only thing I would like to add is, that if you wear 2 or 3 pairs of rubber gloves you can handle the very hot stuff much better.
I used some cheap and pretty fast hardening epoxy, you can see it on the right of the first picture. Milliput and Greenstuff would also work fine but would need more time to get hard.
As a first step I made the mould, my mate Olli made a video of another mold I made to demonstrate how I used the silicone:
The following pictures show what I did after the mould was ready to use.
After the epoxy was pressed in the mould, it was hardened after approximately 30 minutes. Then I took the dublicated part from its mould.
A pair of selfmade tank tracks.
A first testfit shows that the new tracks fit fine.
I also dublicated the front hatch but then I mentioned that I could use the original part from the kit.
The sideskirts were also cloned, the new parts are pretty fragile but almost as thin as the original part.
Now it is getting advanced, I tried to copy a full tank hull. Since the M163/M901 have different tops, I temporarely glued the top of the M901, the version I wanted to recreate, with whiteglue, then I repeated the steps to build a new mould:
When the mould was hardened I had to cut it on both ends to get the kit out of the mould. On the first look the mould looked alright but a closer inspection showed that the temporarely fixed top part of the tank had seperated from the tank hull, what caused a slight deformation of the mould.
But anyway...
I filled the new mould with the epoxy, since I did not have not enough of it, I added a dice into the mass to compensate this.
The part fresh released from the mould compared to the original part. You can see, thanks to the defect mould, one of the edges of the new tank was sunk in.
But that did not stop me, Istill had the original top part which otherwise would not be used.
A first dryfit shows that I would have to sand down a big part of the top.
The first layers of the hull were sanded down, one step closer to success.
The top part was glued on the hull, using cyanoacrylic gel glue. The tracks were dry fitted on the new tank, after some sanding they fit almost perfect. Also their thickness was after some sanding just like the original.
The new parts are ready to get glued to the tankhull.
The remaining gap between hull and top was closed with Milliput. Then I attached the tracks and sideskirts. The last part to build was the TOW launcher which was magnetised.
Compared to the original model the dublicated model does not look too bad, you may compare it to a garage kit made from worn out moulds made by an absolute beginner. The quality is not perfect but I like this thing very much, not only because I found a new way to recycle some leftover bits.
When I get a second M163/M901 "TANKS The Modern Age" expansion, I definitely will try this again.
But take a look at the result for yourself.
The only greater fault is one of the tracks. Idid not glue it straight on the hull. When I noticed it and tried to remove fix this, the trackpart broke. Because of that I kept it as it was.
Last but not least, a picture of both finished tanks. The dublicate does not look too bad or does it ? In the next post I will give this kit a closer look.
Part two of the pictures I made at this years Tactica in Hamburg. Sorry for the delay but I had much to do and did not find a quiet moment to upload the pictures in the last weeks, in the next weeks there will be more time for postings.
The first set of Tactica 2019 pictures can be found in this post.
Many pictures were bad, maybe I will upload them in a separate gallery, but here are some of the nicer pictures I made. There is no special order in the pictures, but between them you will find some some lines about some things that I wanted to mention.
The guys from the Ad Arma tabletop club in Haßloch had a very nice demotable for WW2 Kampfzone, a tabletop game in 1:35 scale. We had a small talk with them, they were nice guys who made their own game, which took some years to finish.
Too bad that most pictures of the table were not sharp enough to see details.
PB12 is a generic system for tabletop games. With this you can play battles between all thinkable forces, how about Romans versus Tyranids, it would be possible with PB12. You will find all infos, the ruleset, units and much more on their homepage.
I will definitely check this out in the future.
A classic from my childhood now in 28mm, just like last year the guys from the Tabletop Kiosk had a very nice "Masters Of The Universe" themed table. The Castle Grayskull scenery piece was very impressive. Many of the miniatures used for this are heavily modified, you can find some before/after pictures in their blog.
They played a modified version of the Bolt Action ruleset.
There were (at least) two great Star Wars Legion tables. I liked the fact, that these guys used electronics to improve their scenery parts. On a defence turret was a motor built in, that thing made the turret rotating, and some buildings were lighted. Also very fascinating were some minis with LEDs built in, for example the Darth Vader mini which can be found in this post.
And then there were the people from the Star Wars Dinner Hamburg, a Star Wars reenactment group, see some of them on the first and the last picture of this post.
I had the chance to watch a game of Gaslands for some minutes because this game is on my watchlist since it was published. I like the idea of cars battling each other in a post apocalyptic world. Maybe I will organise a session when I have the ruleset.
I like the idea that only the rules and templates are needed, you will have to build your own car from an 1:64 Hot Wheels or Matchbox car for this game.
That is all for this years Tactica. Since I have much more time in the next weeks than in the weeks before, in the next days I will continue the closer looks at some "TANKS The Modern Age" expansions, a first post is almost finished, and I built an M163 and an M901 from one box, resulting in a future post about bitsrecycling without the 3D printer.