Showing posts with label German Tanks. Show all posts

June 10, 2018

15mm German
Tankhunters

A bunch of 15mm German vehicles I finished. All were painted in the Hinterhalt camouflage pattern which I use for all of my German tanks.


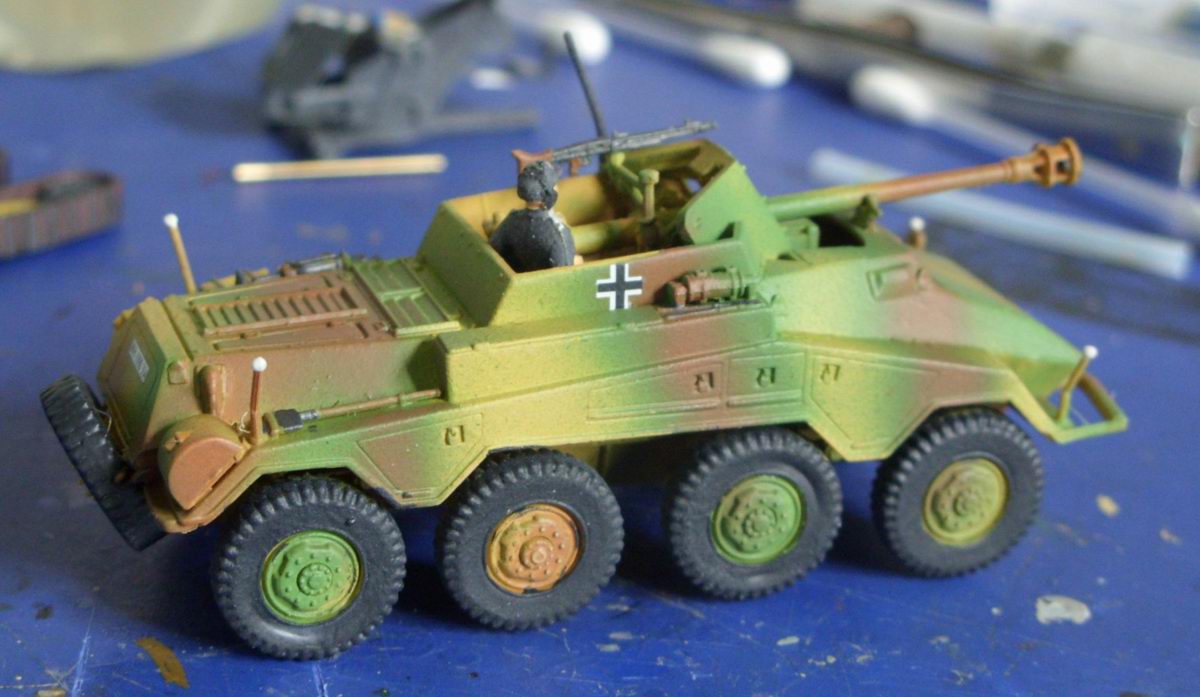
This is my Sd.Kfz.234/4 from Battlefront miniatures, some years ago I built one of these in 1:72.
I bought the TANKS version of this model which offers four different options to build. If you want to use it for TANKS, you get two different tanks you can use ingame, but you have to decide which version you want to build.

I built the Sd.Kfz.234/4 from this kit. Seeing the stats of this unit it may be an good option to use.  After some Google search I found out that it is not too complicated to build this kit that you can use all four possible versions, but I decided not to do this.

Instead, I turned on the 3D printer and made myself a Puma wheeled tank. Since I did not want to post about 3D printing this time, there is no picture of it

Seeing all the bits that are left over, maybe it is time for some more creative bits recycling like I have done before.


Three Sd.Kfz. 139s, built from bits from the Plastic Soldier Company Marder III kit and 3D printed hulls. Some lines about the construction can be found in this post. If you compare #1 and 2 and the number 3, you will see, that I used different settings on the 3D printer.

Some minor parts like the exhausts and the storage boxes of the number one and two had to be built from scratch, but after the paintjob they look great from a certain distance, but in close look you see the messed up details.


Two Marder III from the Plastic Soldier Company Marder III kit. I had to choose which tank to build from this kit because it offers three different tanks to build from.
I built the Marder III from this kit, I like it's shape. And I am pleased with the results. Both tanks have a different finish, even when I used the same paint, maybe it comes from the fact that I sealed one by hand while I sealed the newer one with the airbrush. And maybe it got a little too much matte paint

Today I started to rework some ruined buildings from Amera Plastic Mouldings. This will be much to do, but using my airbrush saves a lot of time.

June 9, 2018

Komm, wir gehen
nach Panama

Yesterday the Montagsmaler went rogue and met, even when it was Friday. My mate continued the paintjob on his German tanks, last week we removed the old paint, basecoated them, and gave them a first layer of paint.
While Olli removed the masking tape from his Tiger, the tank's paintjob looks somehow like the Tigerente from German children's book author Janosch.

At the moment I am preparing a handful of post for the next days, a lot of stuff piled up in the past few days that a I would like to show you.

May 22, 2018

Part Plastic Soldier Company
Part 3Dprinted
15mm Sd.Kfz 139

In the picture above you see a Panzer 38(t) hull fresh printed with the Anet A8. Today I managed to print it to build a Sd.Kfz. 139, using the bits leftover from this post.

I took a small video with my mobile to give you a small look at the printing process. The selfprinted fan mount made the printer way more silent.

After some cleaning it looked like this:
I used new printer settings, the two 38(t) hulls I did before were printed with a different setup. Which means, there are differences in the printquality of the three hulls I made. Maybe more on this in a future post.
The overall details of the hull are ok, while the roadwheels were printed incorrect. Even the machine gun and the exhaust were printed in acceptable quality.
All in all,this time the hull was printed better as the roadwheels were not.

The hull roughly drybrushed, viewed from different angles. The top, front and back were printed properly. The roadwheels had some holes and gaps, that I had to use some Vallejo acrylic putty to give them a rought filling.


Both parts were prepared to fit and glued. I had to add a piece of plasticcard to close a gap in the back of the structure.
With minor efford another tank was built today. It looks a little crude on close sight, but it will make a decent gamepiece when it is painted.

May 18, 2018

Plastic Soldier Company
15mm Marder III
And Bitsrecycling With
The 3D Printer

Yesterday I built another Marder III kit from the Plastic Soldier Company. It is a nice little tank and it's built went without any problems. There were neither sinkholes nor flash on the sprue. It will get the same paintjob than the one I already painted.

From this kit you can build three different tanks: the Panzerkampfwagen 38(t), the Sd.Kfz. 139 and the Marder III, which I built. When I was finished with the constuction of the left tank on the first picture some months ago, there was a massive amount of bits left in the sprue just as today.
Take a look at the picture below:

Not only that there are 8 crewmen included, there was a full 38(t) turret and a complete Sd.Kfz. 139 upper structure left in the sprue.
This would be a lot of plastic that would vanish in the bitsbox, maybe I could use the 38(t) turret to build a bunker, they were used to guard borders and other structures. But this means there is still the complete upper half of a tank, which may be used.

Days later I had an idea. I turned on the 3D printer and printed a Panzer 38(t) hull from this great collection. Then I tried to build a Sd.Kfz.139 from the structure of the PSC kit and the selfprinted hull. With some sanding, some putty and a lot of superglue I made it. I had to replace the mg barrel but the only things I had to build from scratch were the exhaust and the storage box on the back.

While we are running low on filament, today I did not print a hull for the actual structure I have left, but I did this two times before. When I will do the modification to a third tank, I will make a post about the built.

Both lower parts of these tanks were printed. While it looks a little crude on close sight, these tanks will be decent gaming pieces. They will be used as custom units for TANKS, I made first tries on creating new units for the game from this template.
But before this will be done there are a lot of things to finish before.

May 11, 2018

MENG 1:48
King Tiger


Pictures of the Meng 1/48 King Tiger I finished today. This tank was modelled after the King Tiger from the playstation 4 game "World War Toons".
I instantly fell in love with this chunky design, and when the kit arrived, I was impressed by it's quality, even when it is a fastbuild kit designed to be build without glue, this kit is very detailed.

The build made a lot of fun and went pretty straight forward, yesterday I needed about 2 hours for constuction, the paintjob was done today via airbrush. Then I used a little drybrushing and added some wash on selected part of the model.
The numerical decals I used were included in the kit, the German crosses were taken from the sparebook.

The only annoying point are the rubbertracks which could be better. I had to remove the inner trackguding line for a better connection between track, glue and roadwheels.
A pair of hardplastic tracks would be perfect for this kit but it seems it is depicted more as a toy and not as as model kit.

I used a figure from the set "Ilsa and the She-Wolves" made by Pulp Figures as tank commander which fits very well with the scale of the tank.

The final picture shows the size comparison of a regular King Tiger and the toon version. Both kits are in 1:48 scale, but as you see, the Meng King Tiger may be smaller but appears very bulky.

In my opinion this tank could easily fit in 28mm weird world war 2 games, armies or scenarios. Use a bigger gun and let it travel to the 41st millenium.
My tank will cruise through the remnants of Rügen to find the origin of the so-called "Rügen Incident" and get valuable artifacts from this place.
 

January 22, 2018

My Method To Paint The
German Hinterhalt
camouflage pattern


In this post I will show you how I paint the German Hinterhalt camouflage pattern. This is very time intensive, I needed for two tanks six hours, but I think it is looking fine.

Step 1:
Apply the three basic colors you want to use. In this case I use sand, green and brown.

Step 2:
Apply dots of sand to the brown and green parts of the tank

Step 3:
Apply dots of green to the brown and sand parts of the tank

Step 4:
Apply dots of brown to the green and sand parts of the tank

Step 5:
Use a light thinned black wash on the whole tank. In this case I use GW Nuln Oil and War-Ter® with a 70/30 ratio.

Step 6:
Give the tank a light drybrush with some kind of bone color/light beige.


The next steps (for that I did not do any pictures) are the following:
- paint all details
- apply gloss coat to the parts you want to use decals on
- add decals
- seal the whole tank with dull coat (still not done)

Maybe some of you readers will try it for yourself, I have still a StuG and a Panther waiting for this kind of paintjob, which I maybe will paint today.


October 14, 2017

Rügen'46:
Vorwärts Zombies !
(28mm Nazizombies)

Built and painted nazizombies. The figures are a mix of Studio Miniatures Nazi Zombies, Mantic Zombies and Warlord Games German infantry. The figures are not planned for use in any game at the moment, but who knows the things to come.
The paint racks in the background were built "on the fly" from some scrapwood and my trusted hotglue pistol. Maybe I will post some time in the future how to build some kind of rack but only when I need more room for my paints.

The tank is a 1:48 scale Tiger II tank from Arii and had the option to build it with a motor and a cable controller. While I am very satisfied with the camouflage I made with my airbrush, the model is poorly detailed with very bad rubber tracks. I have also a Sd.Kfz. 250 painted in the same scheme that I will show later. 


I painted the wounds and bloodstains with Citadel Blood red and some Citadel Crimson gore, the skincolor I used was Vallejo (can't read the first word)  Wolf Grey or Pegasus Ghost White and the uniforms are painted with Revell Aquacolor Olivgrau.


After some decent drybrushing of the uniforms I used various washes, I can't remember all of them but I remember the great red wash my mate Olli gave my for this.


The female trooper comes from the set "Ilsa and the She-Wolves" made by Pulp Figures and got some extra bits, the officer with the spear comes from West Wind Productions. The main colors I used for the uniforms are the same I used for their dead comrades. But except for the skin I did not use other washes.

-
It has been more than 6 1/2 years that I posted the last time in this blog, I suddenly stopped to build and paint stuff because other things were more important.

Some time ago I restarted modelling because it is fun fore me again and there are so many kits that are waiting for glue and color. With my mate Olli ,check his blog, I am building some tanks and scenery for Galeforce 9's game "TANKS".
We had some games and other friends are joining that you should be prepaired to read more about this game.

October 19, 2010

Italeri 1:72
SdKfz. 234/4


Pictures of my finished SdKfz. 234/4. The figure came with an Italeri kit and doesn't have legs because it was commander of another tank before wher he did not fit with legs.

This kit was build some months ago, I remember that all parts fitted very well. The construction went without problems, but on the next kit I will not glue the wheels before I paint it, this will make it easier to paint.


And I learned something new. I accidently bought glossy mud brown that I used for the camo pattern, but I recognized it after I applied it. That's why the brown in the previous post so shiny, I thought for alsmost 3 hours that the color was still wet.

But after the last layer of matte paint the brown spots weren't shiny anymore. Great, I didn't knew that before, I tought I had to repaint all brown with matte paint.

October 17, 2010

Italeri 1:72
SdKfz. 234/4
(Work In Progress)


Some pictures of an actual project, this is Italeri's SdKfz. 234/4. This is the first kit that I painted with a "real" airbrush gun, the colors are still a little wet. The used colors were Revell Aquacolor Sand (#36116), farn green (#36360) and mud brown(#36180),  all colors were thinned with alcohol.
The camo pattern is not too bad for a first try and there are some spots where I will use a brush to finish the paintjob.

The picture below shows my new airbrush gun and compressor, I bought the Revell Airbrush starter set (#39199) and I think it is worth its price.
Next week I will publish my videoreview of this stuff, the scenes are already filmed but the sound is too bad, that's why I have to re-record it.

February 19, 2010

Hen Long 1:72
RC Tiger Minus RC

Remember this post with my Hen Long RC Tigers ?

I wanted to start a little tank battle with a friend, but I had to determine that only one of them functioned, all other Tigers did not work. That sucked. So I made my thoughts how I could recycle them.

The first step was to open them and take out all electronics and gears. Then I used Milliput to close all holes of the leds and switches. After the Milliput was hardened I used a hobby knife and some sanding paper to smooth the surfaces. I took some little plastic pieces for detailing the hatches. The next step was to clean all roadwheels from excess plastic (hm, sometimes I wonder about my English), what took a little more time than I tought.

After glueing all parts together I started with the paint. The base color is GW Codex Grey (#61-52) darkened with black, a fresh pot of grey plus 4 or 5 ml Black, that gave me a fine dark grey. Then came a wash with some selfmixed black ink. The drybrushing was done with Hobbyline Grey (#27) and then I painted some details as the ropes and tools, all with different GW colors.

There are only a few things to do, the tracks will get some color, all tanks will get some decals, and last but not least I have to seal the paint with matte varnish. A friend suggested to give them a winter camo, maybe I will do this.