January 25, 2019

Space
The Final Frontier

No, this aint' Star Wars. It's better.
Work in progress pictures of my Battlestar Galactica kit, it is made in 1:4105 by Revell with molds from Moebius Models, who design a lot of starship kits based on the remake of the Battlestar Galactica tv show and other science fiction series.

The 2004 remake of the classic Battlestar Galactica show, get some background informations about BSG in this PDF, is my favorite tv series ever, I could write much about it, and I was lucky when I got the Revell version of this modelkit for a low price at the bay, even when it was already started and 2 small parts were missing.
It was built but then I stashed it, I had other kits to finish on my priority list.

The first thing I did last weekend was to give the kit a layer of primer, for this I use some cheap stuff from the discounter, this stuff is pretty good but needs some time, I gave it 24 hours to dry.
The next step was adding grey, first a complete base layer, then I highlighted the armourplates with a lighter grey. After this I gave the kit a good layer af matte varnish, normally you use glossy varnish, later more on that.
And I absolutetely recommend using a airbrush for kits of this size.

This was followed by a premiere, for the first time I used a selfmade wash based on black oilpaint mixed with lightergas. I read so much about this that I had to try it for myself.

In German it would be easier to describe this than in my crappy English. If you want to try it for yourself , just look for tutorials on youtube.

Usally you need to use gloss varnish for a protective layer, the glossy surface protects the acrylic color from the solvent of the wash and of taking the oil color, but I used matte varnish because I wanted give the whole ship a dirty look.
You can find much better tutorials on this but all you have to do ist to apply the wash, wait some minutes and then start to rub it off with papertowels and cotton swaps.

Depending on the pressure and the rubbing  you will get the result that you want. The final step before you continue to paint this thing is to add another layer of glosscoat, because the oilcolor will not dry completely, it will cause a mess if you do not do this. Use only matte clearcoat if you want the colors to get dull, I used matte because I wanted this effect.

After that I applied some generic grey, not completely, only a very heavy highlighting. This is the actual building state of it.

A detail shot of my Revell Hind kit give you a better view of the look of the highlighted panel lines. The rest of the black was rubbed away. It is not perfect and I may redo some spots, but for my first real try (with glosscoats) of this technique I am pretty satisfied with the result. More on that and (of course) the Hind will come in future posts.

The big advantage of this is that the oilpaint will not completely dry, you can pause whenever you want, all what may be needed is some lightergas to get the paints wet again. And will need a proper stock of cotton swaps since you will need a lot of them.

The base of the stand was painted in Antikbronze, sealed with glosscoat and then I added a layer of oilwash. It was the first time I used metallic color through my airbrush, I had some concerns about cleaning the pistol after that. Maybe I will redo this thing, there are 2 spots that I messed up.

Beside of finishing this kitten, this weekends task is to finish the Galactica, instead of the red decal stripes I will use paint for them, this will definitely look better. I have to go through my source material since I have questions about coloring of some of the details.
At the moment I am preparing some posts, they will appear this weekend.


So say we all.

January 18, 2019

TANKS The Modern Age:
Custom Unit #1

While I was browsing through the units of "TANKS The Modern Age", I noticed that the French army is the only one which can use artillery units. This brought up the idea to create a custom artillery unit, based on the values from the French unit, for the other armies of the game.

For the new custom unit I choosed a kit of Zvezdas "Hot War - Battle For Oil" range which offers some nice potential gaming pieces. The American side will get the M109 selfpropelled Howitzer, on which I took a closer look in this post

I found this template but decided against it and made my own template card from scratch. Of course I used a picture of the kit which I built. Even for an low experienced software user like me it was possible to do, using only MS Paint and Paint.net. The only problem was to find a fonttype which is readable at lower sizes.

The other minor problem was the scaling of the card. The template I created while I wrote this post was too big, because I mismatched the lenght of the card. But this was fixed.
The final card as seen on the picture is a little too small, but this happened because I forgot the autosizing of the printing software which my local copyshop uses. The card itself is in the right measurement.

The M109 with its comrades, I hope it will meet its expectations.

Now no more words, here are the new custom cards for "TANKS The Modern Age". At the moment I will offer them as uncompressed bitmap only, just rightclick and save them.

UPDATE:
A remade card is now available in PDF, just follow this link:
https://drive.google.com/file/d/1XVljlYe99oMufFm9zYUMShzp3MgoXtnP/view?usp=sharing


This is Version 1.0
The final version will be released as PDF file.

There are 3 possible ways to print the cards, you can use your homeprinter if you own one. If you choose to print the files at home, you may setup a textdocument with the files and export it as PDF before.

The second method is to go to the local copyshop and let them get printed there, that is what I did.

The third method is to go to your local drugstore, it may offer to make prints from your digital photos. This was tried also, I have to change one or two things on the card, and then I can try to print them on glossy or matte photopaper.
On the second picture of the post, prints fom the copyshop (2,4) and photoprints (1,3) are shown, I prefer the photographs.

I never thought about the possibilities of photo printing services, this may get a seperate post in the future, maybe when I will design the next custom unit, this time the Soviets will get their artillery unit.

1:100 US Tanks
For
TANKS The Modern Age

I recently build and painted my first tank platoon for "TANKS The Modern Age". It is made of two Abrams from Battlefront Miniatures and one M60 from the Plastic Soldier Company, all in 15mm scale.

The Abrams tanks from the Starterbox and the expansion pack. The upper model was build as the IPM1 Abrams while the other kit was build as the M1 Abrams. Ingame I will use them for all available Abrams variants for the game.

The M60E3 by the PSC. I took a closer look at this model in this post. I thought the tracks were wrong but after a quick internet search I found out they were accurate, at least for that scale.

Except for the primer I used only Revell Aquacolor paints and Vallejo washes on these. After the models got primed, I used Olivegreen for a basecolor, drybrushed with Feldgrau. The camouflage pattern was painted with Leatherbrown and Tar Black. Then a thinned black wash was applied. A last step was to paint the machine guns black, the I added graphite via a pencil for its metallic look.
Before I sealed the kits with matte varnish, the tracks were painted  with Olivegreen and Steel, followed by a first wash of thinned black, followed by some spots of Vallejo Rust wash.
No decals were used, but I may add them later.

No I will only have to finish the Cobra helicopter, it is already built and basecoated, and this time I tried something new, but more on this in a later post. Maybe this weekend, but before I will do this, it is time to continue the work on the Meng Tiger I showed in a previous post.

January 14, 2019

TANKS
By Galeforce 9

A closer look at the new starterbox for Galeforce 9's  game "TANKS The World War II Tank Skirmish Game". It is a spinoff frome Battlefront miniatures "Flames Of War" tabletop game, but TANKS uses simple rules for tankbattles in 15mm/1:100 scale. This game is easy to learn and takes not much time to play.

In a future posts I will go in detail with the rules, this post is only about the content of the starterbox.

The introduction on the back of the box says:

Through the pouring rain, you can just make out the smoke billowing from your platoon commander's tank. You are next in command. As if on cue, the radion buzzes. Corporal Stevens, always the cautious one, wants to retreat and regroup. But you know this is your time to strike. The enemy thinks they've got you on the run, got you cornered. It's time to show them what happens when you poke at the hornet's nest.
It's time to lead your men to victory!

The content of the box. All gamematerials are included, only some glue is needed to build the tanks and start a first game of TANKS.

Let us take a look at the plastic first:

Three tank model kits are included, two Sherman tanks and one Panther/Jagdpanther, all three in 15mm scale. All parts are nicely sculpted and casted with no sinkholes or flash, after construction no ejector markings will be seen.
The pictures obove show the Sherman sprue which is included twice while the pictures below show the multiple sprues of the Panther/Jagdpanther kit.


The assembly instructions are simplified, to build other versions than the tanks from this box you have to look online for building instructions, which can be found at the "Flames Of War" website.

I built the Panther, the 75mm Sherman and the uparmoured 76mm Sherman from this kit. All three kits were built without any issues, all parts fitted well. In future posts you will see them painted.

Next to the tank kits are the booklet with the rules and the rest of the needed materials. The stuff that is included looks fine, some terrain pieces and the needed game counters and markers. Both made from durable cardboard. I would use the terrain if I would not prefer "real" terrain.
Also 12 12mm D6, 6 for each player, are included.

Since every tank uses a stats card, let us look at them in the next section of my closer look at the starterbox for Galeforce 9's "TANKS" game.

You get 4 German tank cars and 3 hero cards from this expansion. Compared to the Soviets, the selection is small, but it is a good start anyway. There are more tanks available for each nation, but you have to buy these expansions seperately.

The next nation are the Americans. They get cards for both possible Sherman variants from this box and two more tanks. 4 hero units are included and this is, as for the Germans too, a small but solid start.

The Britons also get 4 tank unit cards from this box but no hero cards. While they get 4 tanks as the Germans, this absence of hero cards limits their playability from this box.

For the Soviets are 8 tanks available. This is a big selection and I think I will get some Plastic Soldier Company or Zvezda tanks to use with these cards. No hero cards are included, but the Soviets get the most units in this box.

Also, each nation gets its special ammunition card.

Beside the ammunition cards you get a lot of global crew and upgrade cards usable for each nations tanks. No doctrines are included in the "TANKS" starterbox.

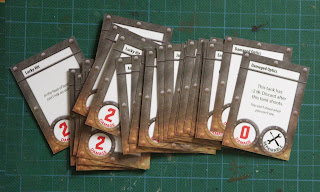
The final thing from the box are the damage cards. The offer some lucky hits and a lot af critical hits, each with its different effect on your tanks. There are some pretty mean damage effects you can draw.

This box is a solid starter. I have read the rules and they seem easy to understand, but if you want to check them out, you can download the rules from the official "TANKS" website. My mate Olli and I like it and we will play more tank battles in the future. And maybe we will find more players for this.

What I do not like on this box is the fact, that there are no hero cards for the Soviets and the British tanks. One or two of them would have been a nice addition.

Finally I have to say that this game is a good addition for my collection. You will read more about this game in the future, just as I am going to write more about its follow-up "TANKS The Modern Age".

January 8, 2019

Meng 1:48
Tiger I

A closer look at the Tiger I in 1:48 produced by the Chinese manufacturer Meng Models. This kit comes from their World War Toons range, which contains models from the videogame "World War Toons".
Last year I built the King Tiger from this range and had a little foresight about the quality of this kit. A nice feature of all these kits is, that they can be build without using glue.

Let us take a look of the parts which were in this nice looking, satin-matte finished box, but please note, this time I made pictures only of the front sides of the sprues.

The first sprue contains parts from the hull and the turret. The quality of the cast is almost perfect. There are no ejectormarks on the front side of the parts.

Next is the upper part of the hull, also nicely made without any flaws. Just to give you an impression of the distorted proportions of this tank, this part is roughly 9,5 x 8,5 cm wide.

Another sprue which is included contains most of the other needed parts to finish the hull and the turret. As mentioned before, the quality of the parts is fine.
There are neither sinkholes nor mouldlines but I was sceptic about the splitted barrel, how it would look when I had finished it.

The last sprue contained in this box is included twice and has all parts for the running gear and the last missing parts for hull and turret. Pretty nice just as the rest of the kit.

And then there are the tracks, flexible but pretty sturdy rubber or PVC pieces with details on the outer side but no details on the inside. As with the barrel, this tracks did not convince me, I was remembering my King Tiger built, where I broke one of the roadwheels while applying them and had to reattach it.
The small sprue on the right is also made from some flexible material, these rings keep the running gear movable if you choose not to use glue on this kit.


Last but not least there are the decals, with sharp edges and a precise color gradiant, but I will not use them since my sparebook containsa good choice of decals which I may use.

Overall, this is a decent kit, with great details and no flaws except for the track and the barrel, but these issuals are my personal opinion
Another time I was surprised by the quality and the grade of details on this kit, for a fastbuilding kit which did not needed to be glued, this kit is GREAT.

This kit was build with no problems and building this kit made a lot of fun. Now it sits on my desk, already primed and is waiting for me to finish this post, then it is time to give this thing its first coat of color.

Update:
Just a quick shot made with the mobile:


-

There is one final closer look at something left that will come online in the next days, as a small hint, a crazy www2 kit is incoming. I made the decision to give some kits from my collection and all new kits which I acquire from now on some closer looks.