February 13, 2019

Revell 1:100
AH-64A Apache

A closer look at the AH-64A Apache attack helicopter by Revell, made in 1:100 scale. I got it from my local model supplier as most of my 1:100 helicopter kits.

This kit appeared 1990 for the first time, this version is the 2016 reissue. And there exists a quickbuild 1:100 Apache, also produced by Revell, but I can not say if this kit is the base for it.


The two sprues of the kit are produced very well with no visible ejectormarkings or sinkholes. The amount of flash is almost zero. Also there should be almost no mouldlines to remove when it will be build.
If I had not two already started helicopters and a big pile of other started stuff, I would already have built i, but this kit must wait.

The clear plastic sprue contains the canopy, it is pretty thin and does not distort the view too much when you look through it.
And this brings up the big minuspoint of this and the three more Revell 1:100 helicopter kits I own, there are no crewfigures. There is a nice cockpit clearpart but no crew that could be seen through it. Even when there are alternatives, I think this sucks.

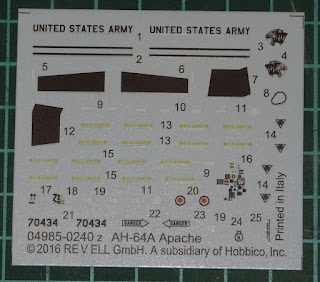
The last missing bit are the decals. As usual they come in good quality but offer only one version to build from, an Apache of the 3/227th Aviation Regiment, stationed in Hanau, Germany 1988. This would fit pretty well in the "TANKS The Modern Age" scenario.

All in all a nice kit. As written, the only negative point for me is the absence of crewmembers. I am no aviation expert, but after a quick websearch I think this kit is accurate. Or at least accurate enough for me.

I think I may create a custom card to use it as a proxy unit for the US Cobra helicopter, it will get its own post, when it is ready. At the moment I am working on ways to optimize my custom cards, but this goes on pretty slow.

February 11, 2019

Reaper Bones
UFO
WWW2 Style

(picture taken from the official product page)
It is getting weird. Last year at the Hamburg Tactica I bought an UFO from the Bones range of Reaper Miniatures. Reaper offers with their Bones sortiment a big range of miniatures for pretty low prices. The reason for this is that the miniatures are made from PVC. This means that the figures as also their details may be pretty soft.

The UFO was stashed away until I suddenly knew what I would do with it some weeks ago. With some modifications it would look like...
The first thing I did was to build 3 gunstations from plastic pearls and plastic rods, and they look ok for a spontanous project. I did not use the landing gear that was included and added a clear plastic rod for a flying base.
This thing was built and painted on a single afternoon.

When all glue was dried I went on with the paintjob, as you can see on the picture above I gave it a two color camouflage with hard edges on the upper side while the lower part was painted in turquoise, all done with Revell Aquacolor paints.
The decals were taken from the scrapbook as usual, I think the crosses came from a Zvezda kit while the yellow pieces came from the Meng Tiger I or II.

The flight stand is not final, also left to do is to build a base for this thing and then its ready for usage. You may already know for what I will use it, this will be totally ridicuolus, but you will have to wait for more infos and eventually some new custom cards until I write a post about it in 2 or 3 weeks.

In the meantime we are working for the weekend, and maybe the Montagsmalers will meet once more this week to continue their roguish projects. I hope I will find some time this week for one or two more posts, so many things to take a closer look at, but if I do not, you may stay ready for next week, I will try to make lots of pictures at the tactica just like last year.

February 8, 2019

TANKS The Modern Age:
The War Goes On

Today me and my mate Olli continued our "TANKS The Modern Age" campaign. For this second battle we changed sides, he went on with the US forces while I commanded a Soviet tank platoon. Since no reinforcements had arrived, we used platoons as in our first game.

The Soviets were advancing to the outskirts of the Bavarian town of Auerbach where the Americans waited for the enemy in defense position.

The Russians rushed forward while the Americans secured their positions at the border of Auerbach. Whose fate was it to win the battle ?

First blood was scored by the Americans, the brave crew of Alpha 66 destroyed one of the enemys T-64. But this did not stop the Soviet strike, in the next round the first M1 Abrams was destroyed.

The battle went on with heavy losses for the Americans, and finally, the only unit which was left for them was their artillery unit, more informations about this custom unit can be found in this post.
But in "TANKS The Modern Age" artillery units are very fragile without any armourpoints and only 3 lifepoints, so this unit was destroyed like it was made of glass.

While the victorious Soviet troops celebrated their victory over the Western aggressor, a mighty thunderstorm arrised. After a series of strange explosions a bright flash appeared and a whole tank platoon had suddenly disappeared.

Could it be that the USA continued their experiments on timetravelling after the tragic incidents in Philadelphia 1943?

The next match will be another civil war. The brave forces of Mother Russia are attacked by an unknown enemy with highly advanced machinery.

February 6, 2019

Rubicon Models
28mm T-34/85

In the previous post I showed my 3d printed/Rubicon hybrid T-34, in this post I show my first finished T-34 from Rubicon Models. It is the T-34/85 in 1:56 scale, a perfect addition to any 28mm Soviet Army.

Building this thing was pretty simple thanks to the well made instructions included and the general quality of this kits parts.

The paints I used were the same as I used for the first 28mm T-34, except for the wash I used on this kit, this time it was Dark Brown Modelwash from Vallejo, mixed up with some Armypainter black wash and a few drops of water. While it still was wet, I removed some of it with a wet brush.

The white stripe was painted with Revell Aquacolor matte white. I masked its shape with tape, and added it with a paintbrush. When it was dry I added some damage with the cuttermesser.

The decals on the tank came from its box, they and the stripe got a coat of thinned GW Gryphonne Sepia wash before the kit was sealed with glossy varnish.

As next step I had another try with Vallejo pigments. I used a mix of Green Earth, Light Slate Grey and water, which I applied generously with an old brush.
When the pigments were dried, I brushed all of them I did not want on the kit away with an old toothbrush. The remaining pigments were fixed with spiritus, then the model got its final coat of matte varnish, as usual I used Revell Aquacolor matte varnish mixed with water on a 1:1 ratio.

By the way, the base green I used on both tanks can be seen on the right of the picture below. Properly thinned it works well with the airbrush.

A comparison shot of both tanks does not show their small size differences on a first view. A closer inspection shows the difference, but I think it is tolerable.

A new entry for the box. As usual I have no idea what I will do with the finished models, but until I find a proper use they will be stashed away in a box like all finished kits, except for this one. Maybe it is time to get a display case for my finished stuff.

The last picture is pretty bad, even for me, but it shows the first 4 steps of the paint process: primer, basecoat, drybrushing, wash. The first hull shown is not from this tank.
You can see pretty well, that I added some metallic look with a pencil to the engine grills, I like the look and all parts which are overdone can be cleaned by the careful use of an eraser.


February 2, 2019

Part Rubicon
Part 3D Selfprinted
28mm T-34/76

Finally I finished the paintjob on my T-34, built from a 3D printed hull, see this post, and the bits leftover from building two different T-34 made by Rubicon Models. Since there were so many bits leftover, I had do do another session of bitsrecyling.

The kit got primed with AK Interactive Russian primer, then I added a coat of a generic green as basecolor. That green was toned down with grey and used for a heavy drybrush, followed by a dark brown or black wash.
For the next step I mixed some Vallejo pigments with water and applied the thin paste very generous on most of the lower regions of the tank and some of its upper regions.

When the pigment/water mix was dried I removed as much of the pigments as I wanted to with a dry toothbrush. Then the remaining pigments were fixed with spiritus, a method I found at this forum, it worked pretty good.

The next step was to add some decals, I used the decals from the Rubicon kit. I used the method described in this post. The Rubicon decals came in pretty good quality but needed more time than other decals spent in the water.
The slogan above the red star came from Peddinghaus Decals, the decal was very thin, just as the "Flames Of War" decals from Battlefront Models, it alos needed a lot time in the water bowl. The horse on the right came from an AER (?) T-34 kit.
Finally the kit was sealed with Revell Aquacolor matte varnish.

I am very satisfied with the result. Especially the decals look pretty fine. As also the pigments. When I made my first experiences with pigments, most were blown or washed away by the airbrushpistol when the model was sealed.
But now, when I fixed them with some spiritus, after the final sealing the pigments are still visible as desired, which was not the case on this jeep.

One of the Mariya Oktyabrskaya miniatures from Stoessies Heroes, shown in this post, just as size comparison for the tank. The figure got a quick and dirty paintjob to use her at the Rügen'46 game last year. When I will find some time she will be repainted.

And another time the Montagsmaler went rogue on another Saturday. Olli helped me with the repainting of the windmills shown in the picture below which I got from this lot. Their paint was chipped, so I airbrushed them and he dried the paint with my hairdryer.
At least the finished bases can be seen on the T-34 pictures.

These things will be scenery for "TANKS The Modern Age", they will get their own terrain rules:

For tanks they are unpassable terrain but do not block the line of sight.
For helicopters they are unpassable terrain on both altitudes and do block the line of sight on high altitude.
Missiles will also be blocked by the windmills on both altitudes.

Just two weeks left for the Hamburg Tactica 2019 where I will pick up some helis and AA units, then it is time for the NATO to conquer the East.